Showing posts with label Repurpose. Show all posts

Saturday, December 20, 2014

{Repurpose} Little Dolly Dress from Daddy's Tee


Big Guy cleared up a big bag of old shirts from his closet and said its up to me what I want to do with them. I would like to "do something" indeed, but I just could not find time to work on it. There seems to be endless work and chores and things to do. If only I have 48 hours in a day, if only I can have a day all to myself, if only I am not so greedy to want to try so many things. If only.

Anyway, enough dreaming. Since the duo fell asleep early last night, I grabbed that chance to take a look into the bag, and found one of his Microsoft Tech Ed tee that he got in 2003. Haha it is old alright! But as that shirt was probably only wore once and very well kept, it looks good as new.

Inspiration strike, and I made this.

The Little Dolly dress.


My sweetie pie was extremely happy when she saw her new dress.

Would not stop dancing.

I added a pair of fluffy sleeves, these sleeves looks good on any girl's dress, like a little fairy who camouflages as little girl to bring us tons of happiness. 


I also added a butterfly appliqué in front to cover up the Tech Ed sign. It was an impromptu addition  but I thought it looks perfect, especially nowadays she is so fond of butterfly after we brought her to the Penang butterfly farm.


And this is the original shirt. Oh-so Booooring. :P

I folded it in half, traced according to her existing dress and I then bid good bye to the old Tech Ed shirt. You may noticed I traced the dress upside down as I thought It looks nicer with the leafy print at the bottom than on the chest.

Thanks Micorosoft for sponsoring this dolly dress for my sweetie pie. :)

So do you have any old T waiting to be re-discovered too? Hope this post give you some inspirations too. 

Stay calm and sew on.


Copyrights © Pui Hua and Fun With Little Ones, 2012 - present. Unauthorized use and/or duplication of any materials within this website without express and written permission from this blog’s author and/or owner is strictly prohibited. Excerpts and links may be used, provided that full and clear credit is given to Pui Hua and Fun With Little Ones with appropriate and specific direction to the original content.

Saturday, September 13, 2014

{Repurpose} Little Bali Dress for my Little Girl


I got a pair of Bali pants that is way too long for me, well I'm a S size you see and the pants is an L, so i look like I'm mopping the floor when I wore it on. 

After trimming the excess off, I realize the pattern on the fabric is really beautiful, it's symmetrical! Since I have another few inches of excess grey fabric I cut off from one of my maxi dress, I decided to join them up and make a new piece for my little girl.

And it is gorgeous when put togehhter!


I added a little black ribbon in the front 

The cross cross on the back. I wanted to make it a halter neck at first but I thought it's more comfortable this way.

My bunny girl looking so cute in her new Bali dress... Doing some dance moves here :) 


The making? It's really easy, the picture below explains it all.


Another easy peasy repurpose project, done! ;)

Happy crafting...


Copyrights © Pui Hua and Fun With Little Ones, 2012 - present. Unauthorized use and/or duplication of any materials/photos within this website without express and written permission from this blog’s author and/or owner is strictly prohibited. Excerpts and links may be used, provided that full and clear credit is given to Pui Hua and Fun With Little Ones with appropriate and specific direction to the original content.

Sunday, August 24, 2014

{Tutorial} Repurposed Shirt for Little Boy


It's raining again (that's what happen when you live in tropical country, it's either too hot or too wet!), our plan to go picnic at the playground had to cancel. While the kiddos were having a nap I decided to take the chance to do a quick repurpose project with my pile of old clothes.

I managed to transform one of my working cloths into a new shirt for my little handsome. Looking smart, ain't him? :)


Let's take a closer look. 

I really like the fine blue lines on this shirt which gives it a rather gentleman look.  I wanted to change the buttons to something more playful, but the lazy bug got onto me, so I'll just do it some other time... 


The good thing of using an existing shirt is that half the job is done for you, especially the seams. So in total it only took me about 30 minutes to complete the entire shirt. The collars, button holes and sleeves are from the existing shirt, basically I just shrunk the shirt few size smaller. 

Keen to make one too? Here's the simple tutorial.. but before you begin, make sure you have the following ready:

• a sewing machine
• a pair of scissors
• some fabric pins
• a fabric pencil (for marking)
• an existing shirt of your little one as sample
• threads with matching color


1. Using an existing shirt belongs to the little one, lay it flat over your old cloth and  trace the edges. Make sure the shoulders are aligned (as shown is picture below). Allow about 1" for seam allowance for the sides and bottom.
2. Using same method, trace and cut the sleeve with 1" seam allowance for the top.

3. Using the extra piece that you have cut out, make a small pocket for the front. Pin on and sew the pocket onto either side of the front piece.

4. With the right side facing each other, pin the sleeve onto the shoulder hole. Sew along with a straight line.


5. Now turn it over, check that you've got the sleeve nicely connected. Then continue to work on the second sleeve.

6. Last step, double fold the edge of the shirt, use fabric pins to hold the folds in place, then sew along a straight line.

7. Finish off by hemming the necessary parts to avoid fray, and that's it, your little handsome's new shirt is done! 

Oh wait a minute, don't forget to sew on your own label if there is one. ;)

Now you may go ahead and admire your little handsome in your new creation that cost you absolutely nothing.  That's what I would call, satisfaction. *pad on own shoulder*


Copyrights © Pui Hua and Fun With Little Ones, 2012 - present. Unauthorized use and/or duplication of any materials/photos within this website without express and written permission from this blog’s author and/or owner is strictly prohibited. Excerpts and links may be used, provided that full and clear credit is given to Pui Hua and Fun With Little Ones with appropriate and specific direction to the original content.

Friday, May 23, 2014

{Tutorial} Little Bubble Dress, repurposed from mommy's dress


Do you have any maternity dresses that you are certain that you won't be needing them anymore? I had a couples left behind and sitting in the storage box for past 2 years..

So instead of letting them rot slowly, I am on a mission to repurpose them into something pretty for my little girl, and this is the second creation of my mission. The first creation is this halter princess dress.

The little bubble dress.


It's made of knit fabric in thin black lines. I thought it looks a little plain so added 2 little red ribbons which really stand out beautifully.

Fits perfectly on my little bunny girl.


Why do I call her my bunny girl? Not a moment that she can sits still. Almost all photos of her are blurry.


In total in only took me about 40 minutes to complete this dress as the ruffle is ready made and only minimal sewing required. Read on the pictorial guide and you will see why it's such a simple project.

Here goes the super easy TUTORIAL.

Step 1: pin & sew
I adjusted the width according to my girl's existing dress, make adjustment according to your toddler.


Step 2: cut & hem
Keep the extra as you'll need it for the straps later.

Step 3: pin & sew

Step 4: cut shoulder straps
The extra pieces from step 2 comes handy now.

Step 5: sew straps & turn


Step 6: pin, sew & decorate
I used red ribbons to create contrasting visual effect, but you can also opt to use buttons, crochet flowers or just leave it as is.

That's it, the little bubble dress is READY!!


I'm happy that my little girl can now wear a piece of what used to be mommy's maternity dress. :)

Happy crafting!


Copyrights © Pui Hua and Fun With Little Ones, 2012 - present. Unauthorized use and/or duplication of any materials/photos within this website without express and written permission from this blog’s author and/or owner is strictly prohibited. Excerpts and links may be used, provided that full and clear credit is given to Pui Hua and Fun With Little Ones with appropriate and specific direction to the original content.

Monday, May 12, 2014

{DIY Craft} ONE Minute Art Pad for My Little Artist


Another new gadget for the kiddo, this time, it's sew free and took me only... 1 minute? 


Yup, 1 minute was all I spent. Using all the available material - an used place mat, some rubber bands, crayons, a clip and and a stack of recycled A4 paper that I cut into half. 


Enough to make my bunny girl super excited to have a new "toy". She has been drawing and drawing nonstop.


The rubber bands kept all the crayons in place. If you like it prettier and neater, just wrap it up with some wrapping papers or fabric, but I really just wanted something quick and practical so I can have some fun time with the kiddos :)


Happy crafting!


Copyrights © Pui Hua and Fun With Little Ones, 2012 - present. Unauthorized use and/or duplication of any materials/photos within this website without express and written permission from this blog’s author and/or owner is strictly prohibited. Excerpts and links may be used, provided that full and clear credit is given to Pui Hua and Fun With Little Ones with appropriate and specific direction to the original content.

Saturday, April 5, 2014

{Repurpose} Halter Princess Dress from Maternity Dress 吊带小公主裙子


What did you do with your maternity dress? I had given away most of them, only left behind some that have obvious flaws, either with some torn corners or missing button, so I have been keeping them aside not knowing what to do with them... Till I finally find the inspiration to repurpose one of them.

Here's the first piece. I made into a halter princess dress for my little bunny. 


Looking oh so lovely on her, isn't it? She wouldn't let me take off her.

The halter back design, easily adjustable length. I got the idea from her daddy's tie :)


Look! Even her little bunny gets a new dress too.. Nothing is gone to waste, not even the fabric scrap.


And this is how the original dress once looks like. The very pregnant me with my best friend.


I love the new dress, and love that she is now wearing a piece that once belongs to me, somehow it gave me a satisfied feeling. 

Hope this gives you some inspiration too!


Copyrights © Pui Hua and Fun With Little Ones, 2012 - present. Unauthorized use and/or duplication of any materials/photos within this website without express and written permission from this blog’s author and/or owner is strictly prohibited. Excerpts and links may be used, provided that full and clear credit is given to Pui Hua and Fun With Little Ones with appropriate and specific direction to the original content. 

Thursday, October 31, 2013

Tutorial: Little Bear New Jumper Suit (Re-Purpose from Socks!)

This is a simple 10 minutes craft and absolutely no machine required. Just a soft toy of your choice, scissors, thread & needle, and a clean old sock, smell free prefer!


I will just do a super quick post, as I have to run to do my laundry soon.

Tutorial for Teddy's Jumper Suit:

1. Find a pair of socks that still has the elasticity, wear it onto the soft toy and cut off with about 2cm extra in length.
2. Slit the middle to form a pant shape. Turn the sock over and sew a "V" line to form a simple pant.


3. Next cut off about 4cm from the remaining of socks, fold half and sew both ends together to form a ring, this wil be the straps for the jumper suit. Find 2 matching buttons too.

4. Now sew the ring on to the center of the front and the back of the pants. Sew on one button each as decoration.

5. Teddy's jumper suit is done. Since it's for soft toy I didn't bother to hem the edges. Just wear it onto the Teddy and adjust accordingly.


Ta-Da! A smart looking Teddy is now ready for cuddle..


I hope this tutorial is easy enough to understand, after all it's a spontaneous  craft that I did not planned for.

If you like this post and would like to see more of these in future, don't forget to like our Facebook page to receive latest update on the new craft idea! ;) 


Copyrights © Pui Hua and Fun With Little Ones, 2012 - present. Unauthorized use and/or duplication of any materials/photos within this website without express and written permission from this blog’s author and/or owner is strictly prohibited. Excerpts and links may be used, provided that full and clear credit is given to Pui Hua and Fun With Little Ones with appropriate and specific direction to the original content. 


Friday, July 5, 2013

Re-Purpose Singlet to Little Girl's Dress! 小背心大变装!

Yay, another re-purpose project completed! It was a spontaneous act of craftiness and I managed to turn this stretchable singlet that was a bit too right into a ruffled little girl's dress. Not sure what you think of it, but I am feeling quite pleased about it. :)


The before and after...


I added a bow and a created a ruffled edges on the bottom of the dress, to create a designer like feel (or so I choose to think so ;)

Thursday, June 27, 2013

Re-Purpose Adult Skirt into Little Girl's Skirts 大裙换小裙


Ever since I have learnt sewing, once in a while I would ransack my wardrobe to look for some old stuff that I can repurpose. It is not that hard after all, there are plenty of clothes that I hardly wear anymore but I just couldn't let go of them. True and true a woman I am, I know! So I am doing myself some good deed now by repurposing them... :)

I found this A line knee length skirt that I have not been wearing for ages. I liked the tiny floral prints but I just do not quite like the way it look on my anymore. So instead of having it occupying my shelf space, I decided to give it a new life. In fact, 2 new lifes!


From a single adult skirt, I transformed it into 2 skirts for 2 little girls. Not bad after all! *self praising mode on*


This was how it used to look like. Simple A line skirt that is a little too boring.

Friday, January 4, 2013

Tutorial: Re-purpose Adult Pants into Kid's Pants 大裤换小裤


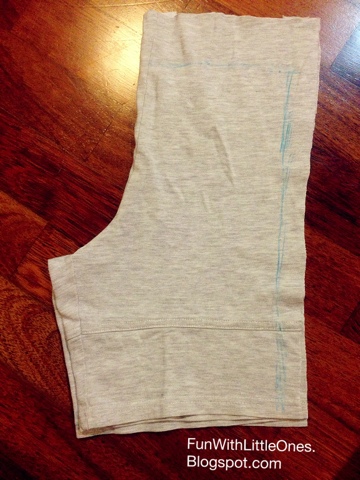
Subsequent to my earlier post on re-purposing my big guy's shorts into my little boy's trendy pants in just 45 minutes, as promised, here's the tutorial.


What you need:
- a sewing machine with matching thread color as your pants
- an adult pants to be used for re-purpose
- a kid's pants to be used as prototype
- a pair of scissor
- a fabric chalk or fabric pen
- an 1" width elastic band (according to your kid's waist length)
- some pins
- a safety pin


Ready? Lets begin now.

Pictorial Guides

1. Identify an existing pants belonging to your little one as sample. Fold the pants in half and align both pants by meeting them in the middle.


2. Draw the the outline of the pants using a fabric chalk. Cut the fabric accordingly. Remember to leave 2" on each side for seam and leave 4" on the top to give room for insertion of elastic band later.


Skip step 3 if you are not sewing a pocket.

3. You have to adjust the pockets cut out according to your desired size and length, and secure them onto the pants with pins before sewing them on.


A ready pocket, useful little pocket :)
Noticed I used double stitches on all 3 sides? its to add durability.


4. Now, turn the pants to the wrong side (Inside out), sew the both sides in a straight line.


5. Hem the edges neatly using a serger, a zigzag stitch or you may use the method I used below - by making inward fold on both sides and sew them sealed.


6. Turn the pants back to the right side now, fold the waist part backward to form a waist band, approximately 2" length. Secure the waist band using pins.


7. Sew along the waist band, do not seal it completely yet! Leave a 2" gap, this is where you insert the elastic band.


8. Measure an elastic band according to your kid's waist line, insert into the waist band and pull it through using the help of a safety pin, before finally sealing it.


8. That's all, your pants is ready to wear now. Super easy isn't it! ;)


If you have any question on this tutorial, do post a comment and I'll try my best to explain.

Till then, cheers and happy weekend everyone!


Copyrights © Pui Hua and Fun With Little Ones, 2012 - present. Unauthorized use and/or duplication of any materials/photos within this website without express and written permission from this blog’s author and/or owner is strictly prohibited. Excerpts and links may be used, provided that full and clear credit is given to Pui Hua and Fun With Little Ones with appropriate and specific direction to the original content.