Showing posts with label Tutorial. Show all posts

Friday, December 18, 2015

Make Your Own... Christmas Craft!


Christmas is one of our favorite holiday of the year, a peaceful and meaningful occasion that unites us with the loved ones. The kids love it the most too as that's the time they receive gifts (who does not like presents? *laugh*)

The duo and I setup the Christmas tree, lighted it up but we wanted to make our home really really Christmas-ty, so we started making more some Christmas craft. Here's how make your own Christmas decor with with absolutely no cost! 


Using plain papers, we've cut out lots of shapes - snowflakes, Christmas cottages, Christmas trees, and even volcanoes..


Then we made Christmas cards.


Next we made an ever Christmas wreath. Since it is made of fresh Christmas tree twigs, it smells so good and we decorate it with fresh flowers from our garden everyday.. 


Then we deployed these crafts all around  the house. By using blue tac stickers, the papers stick on easily without damaging the surface. The duo were so excited going around the house sticking on their Christmas cottages and trees... They we so proud as they showed daddy later at night.


Make Your Own... Popsicle Stick Tree!

You can either purchased a set of ready packed craft set (E received it as birthday pressie last year) or buy the Popsicle sticks from stationeries or bakery supplies stores. Then just glue, paint, stick!


What about some sparkly stars too? 


Make Your Own... Snowflakes! 
We followed these simple steps to fold the paper and just cut out any shapes of snowflakes we like, it was too challenging for C as the paper is rather thick to cut, so I let her design and I did the cutting for her.. You can practically design endless shapes, creativity is your only limit!


Make Your Own... Felt Christmas Tree!

Not to forget, our cute felt Christmas tree which functions as a child play too.

This Christmas tree was made with large button holes to let little ones learn to button on and off. It served its purpose well - both E and C practiced by themselves and can handle buttons well now, and it is such a pretty addition for the door :)


Not a crafty person? This is a super easy one that requires no crafting interest at all..

Just get a real small size Christmas tree from IKEA for only RM8.90, hang  some golden ornaments or balls and it is perfect addition for indoor or the garden.. Well, will have to change it to a beautiful pot thou. *smile*


That's all peeps, easy-peasy craft to brighten the home. 

Hope you have a wonderful time bonding with your little ones and celebrating with your loved ones..


Xoxo,
PH


Copyrights © Pui Hua and Fun With Little Ones, 2012 - present. Unauthorized use and/or duplication of any materials/photos within this website without express and written permission from this blog’s author and/or owner is strictly prohibited. Excerpts and links may be used, provided that full and clear credit is given to Pui Hua and Fun With Little Ones with appropriate and specific direction to the original content.

Saturday, December 5, 2015

{Tutorial} DIY Christmas Wreath


It's December, my favorite month of the year! It's time for birthdays, holiday and Christmas!

I have been thinking of getting a Christmas wreath for our front door, but somehow I was secretly hoping for something that is real and evergreen.

God must have heard my wish, this morning I saw my neighbour's gardeners trimming down his Christmas trees. A lot of branches were cut and discarded, and and I thought they are just perfect for making a fresh Christmas wreath.

So I asked the gardeners to spare me some nice cuttings, and they generously gave me a bunch. I made this in 30 minutes - A DIY Christmes wreath that gives a fresh scent of greens. All natural and free!


It looks great over a dark green background too.

To make this, you need the following:
• 2 wired hangers 
• 1 cable protector (from IKEA)
• 2 dozen Christmas tree cuttings *
• 1 hot glue gun & hot glue sticks
• some Christmas ornaments
• 30cm long red ribbons 

* if you cannot find fresh Christmas trees, you may use the store bought plastics leaves.


The Making:

1. Using your hands, bend the hangers into a round shape (it's ok if it is not a perfect Robb's, it is not noticeable once you cover it up with the leaf)

2. Covered it up with a cable protector. Seal the opening with the hot glue gun.

3. While waiting for the hot glue gun to heat up, cut each Christmas tree cuttings into about 4"-6" in length.

4. Using the hot glue gun, glue one cutting at a time in one direction until it's fully covered. 

5. Inspect for any uncovered spots, conceal with smaller cuttings.

6. Glue on th Christmas ornaments of your choice (suggest to get something light)

Tie a ribbon over the hanger's hook and your Christmas wreath is done! Now go ahead, hang it up to impress your guests and neighbors.. *smile*

Cheers!


Xoxo,
PH


Copyrights © Pui Hua and Fun With Little Ones, 2012 - present. Unauthorized use and/or duplication of any materials/photos within this website without express and written permission from this blog’s author and/or owner is strictly prohibited. Excerpts and links may be used, provided that full and clear credit is given to Pui Hua and Fun With Little Ones with appropriate and specific direction to the original content.

Sunday, December 7, 2014

{Christmas Special} Little Pony Minky Blanket for my Little Guy, withTutorial!


I have been making Christmas presents for my little ones since I've picked up sewing as my secret hobby (although it is no longer a secret now..), I often started without an idea of what to make, until inspiration hit. Such as the  little matryoshka doll dress, the Christmas pajamas, the diy felt Christmas tree that works as sensory toy as well as decoration, or this convertible christmas felt playhouse that caused me weeks of sleepless nights.

This year, I got my inspiration when I saw the Minky fabric on sale. I have been searching for them with no luck but this time since they are within reach, I grabbed both red and blue Minky without second thought.

So for this year's Christmas, I have a new addition to the list of handmade gift for my kiddos.... Present to you, the Little Pony Minky Blanket in Blue.


I know it's meant for Christmas, but he could not resist when I showed it to my little fella. He loves hugging the ultra soft dotted blanket to bed, wraps it all around himself and rubs the dotted Minky like its his favorite soft toy. 

The little pony fabric embroidery sticker is a gift from my dear collegue Yuky, who brought it all the way home from her oversea trip. I have been keeping it in my craft treasury basket, you know, something this cute should pair with something special, and I finally found the right match.


The size is just perfect fitting for a single bed. I used 2 yards fabric each for the snowman and Minky fabrics. It costs a bit but after all this is one special handmade that money can't buy. I won't complain :)

See how perfectly it fits?

Interested to make one too? Here's the how-to!


Tutorial - Minky Blanket

1. Find 2 yards of the top and backing fabric of your choice. Believe it or not, this took me the longest compare to the rest of the steps, before I finally settled with my selection here.


2. Iron the cotton fabric to ensure its all smoothed out.

3. Cut the fabric to the desired size. Leave extra 1cm on all 4 edges of the backing fabric as it will be double folded for the sides. 

4. Using fabric pins, pin the wrong sides of the fabric together. This will helps to hold the fabric in place as you sew.

5. Now, time to start sewing. Best part of using Minky is that the dots on the fabric serve as guidelines to sew without needing to make marking. I counted 7 dots apart for each lines. 

However, Minky can be a bit hard to control as it is very smooth hence slippery, so I would suggest you to use medium speed instead of your normal sewing speed.


To make it more manageable when sewing (as you get to the last half yard you will find it is getting increasingly difficult to control due to the sheer volume...), I rolled up the completed parts inch by inch as I progressed.

6. Now that you are done with sewing all the straight lines, time to work on the edges. Double fold all 4 sides to about 1cm width and hold them in place with fabric pins, then start sewing. 


7. That's it, you are done! Now feel free to make yourself a cup of hot coffee and admire your newly made blanket, or invite your kiddo to roll out it.


If there is any part of this tutorial that is not clear to you, feel free to pop a question or two in the comment box below. I will respond soonest I can.

Next is the red minky blanket for my little girl, that shall take awhile as I am planning to make patchwork again, the last  Autumn Love Baby quilt I made for her a year ago is way too small now, she is growing like a sprouting magic bean.

So, stay tuned.. Or you may add yourself as the Facebook fan or followed by email if you do not wish to miss out the update. ;)

I am so in the mood for Christmas! ⛄️


Copyrights © Pui Hua and Fun With Little Ones, 2012 - present. Unauthorized use and/or duplication of any materials within this website without express and written permission from this blog’s author and/or owner is strictly prohibited. Excerpts and links may be used, provided that full and clear credit is given to Pui Hua and Fun With Little Ones with appropriate and specific direction to the original content.


Friday, May 23, 2014

{Tutorial} Little Bubble Dress, repurposed from mommy's dress


Do you have any maternity dresses that you are certain that you won't be needing them anymore? I had a couples left behind and sitting in the storage box for past 2 years..

So instead of letting them rot slowly, I am on a mission to repurpose them into something pretty for my little girl, and this is the second creation of my mission. The first creation is this halter princess dress.

The little bubble dress.


It's made of knit fabric in thin black lines. I thought it looks a little plain so added 2 little red ribbons which really stand out beautifully.

Fits perfectly on my little bunny girl.


Why do I call her my bunny girl? Not a moment that she can sits still. Almost all photos of her are blurry.


In total in only took me about 40 minutes to complete this dress as the ruffle is ready made and only minimal sewing required. Read on the pictorial guide and you will see why it's such a simple project.

Here goes the super easy TUTORIAL.

Step 1: pin & sew
I adjusted the width according to my girl's existing dress, make adjustment according to your toddler.


Step 2: cut & hem
Keep the extra as you'll need it for the straps later.

Step 3: pin & sew

Step 4: cut shoulder straps
The extra pieces from step 2 comes handy now.

Step 5: sew straps & turn


Step 6: pin, sew & decorate
I used red ribbons to create contrasting visual effect, but you can also opt to use buttons, crochet flowers or just leave it as is.

That's it, the little bubble dress is READY!!


I'm happy that my little girl can now wear a piece of what used to be mommy's maternity dress. :)

Happy crafting!


Copyrights © Pui Hua and Fun With Little Ones, 2012 - present. Unauthorized use and/or duplication of any materials/photos within this website without express and written permission from this blog’s author and/or owner is strictly prohibited. Excerpts and links may be used, provided that full and clear credit is given to Pui Hua and Fun With Little Ones with appropriate and specific direction to the original content.

Tuesday, March 25, 2014

{Mini Tutorial} The Making of Princess Elsa Dress

As promise, I am now sharing the pictorial process on the making of the Frozen inspired Princess Elsa dress, it is not a full tutorial but may give you an ideal how the dress is assembled. These steps may be useful reference if you intend to make one for your little precious too. 

No pattern available for download as I drafted it using one of her ready-made dresses. In total it took me about 3+ hours to complete the whole dress, not a very difficult piece but would require some basic in sewing and handling tulle fabric, which is not so forgiving on stitching mistakes.


The materials needed:
  • 1 1/2 yard of satin fabric (for bodice & skirt)
  • 1/2 yard of lining cotton fabric (for bodice)
  • 2 yard of tulle fabric (for skirt)
  • 3 matching buttons 
  • 2 2" thin elastic
  • Sewing machine and matching threads
Note: all measurement is based on closest approximate as I was using leftover fabric without measuring.


The Making

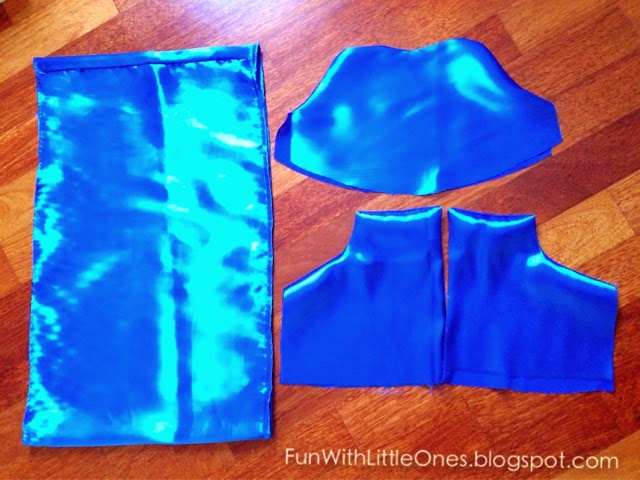
1. First, cut all the pieces:
• 1 set front bodice (satin & lining fabric) - refer 1
• 2 sets back bodice (satin & lining fabric) - refer 2
• 1 set skirt (satin & tulle fabric, lining not required) - refer 3a & 3b


2. The sew the top bodice pieces with the lining; sew the tulle fabric onto the skirt using the longest stitching length (you may want to check your machine's manual), then pull both ends of the thread to gather the skirts. 

To create ruffle effect for the tulle skirt, remember to cut the skirt fabric at least 50% longer than the bodice. Hence the ratio of bodice to tulle skirt should be 1:1.5. 


3. Press all the pieces with warm iron (this is one important step not to be missed!).


4. Attach the front & back bodice on the side, with right sides facing. Sew and serge around the raw edges.


5. Using fabric pins, attach the tulle & skirt to the bodice, again with right side facing. Serge around the raw edge to avoid fray.  

If you are uncertain how to make this step, don't worry.. Ashley from Make it & Love It have a great tutorial on how to make and attach gathered/ruffled fabric


6. Now the skirt is 80% done. Attach 2 rectangular tulle as shoulder straps. You may want to try it onto your girl at this stage to ensure its of the right length.

7. For the cape, I just used 1/2 yard of tulle fabric, serge the edges and attach the elastic loops on top corners to form a "U" shape, so it can easily hook onto a button. 

8. Add on the embellishments, the buttons and ta-da... we are done! 

I made the covered fabric button using the toolkit bought from Daiso, it's really easy to use. You can check out the previous post here.


This picture basically sums it all.


The simple, elegant Princess Elsa dress for the little girls we love. Please please do share if you have make a similar dress too.. I would love to hear from you! ;)


Just a Tip..
When ironing the satin fabric, I would recommend you to iron it from the reverse side (non shiny) to avoid risk of leaving a burnt mark on the fabric.


Copyrights © Pui Hua and Fun With Little Ones, 2012 - present. Unauthorized use and/or duplication of any materials/photos within this website without express and written permission from this blog’s author and/or owner is strictly prohibited. Excerpts and links may be used, provided that full and clear credit is given to Pui Hua and Fun With Little Ones with appropriate and specific direction to the original content.

Monday, March 17, 2014

{Tutorial} A Handy Tote for my Old Ma


My old ma had been unwell for a while, we had been visiting hospital frequently with her and I noticed she needs a bigger bag to carry her personal belongings. So, I spent the Sunday afternoon to make her this handy tote bag while the kids busy entertaining themselves - playing blocks, singing songs from Frozen and  had fun video-graphing themselves over and over again. I was the only fortunate audience that afternoon. 

The tote bag comes with 3 front pockets for storing her water bottle, mobile phone and umbrella. The 2 side loops are for hanging keys or just for decorative purpose. I used the same magnetic buckle which I used for the modern nappy bag I made for myself last year.


Have I mentioned that few custom nappy bags were made for some proud owners too? The happiness was when I received their thank you notes, at least my design had been pretty useful to some ladies out there. *smile*

This tote comes with a large internal compartment in matching fabric for her medicine and cardigan that she always bring along.


Complete with my label on the handle.. *always a moment of pride*


I kept to a simple design as my old ma doesn't like anything elaborate (so do I, like mother like daughter!).

Hope my old ma likes it and may God bless her abundantly and grant her speedy recovery. 


In case you would like to make one too.... 

Tutorial

I did not prepared a pictorial tutorial as I was making this in a rush, I wanted mom to be able to use it for the next appointment. However, here's a simple step-by-step sketching that explains the design. I assume you have some basic in sewing before you try to understand this drawing...:

You shall need:
  • 1/2 yard of thick cotton for the tote bodice
  • 1/4 yard of medium weight batting for the insert
  • 1/4 yard of matching or contrasting fabric for the front pocket and handle. 
  • 1 magnetic buckle or replaced with a loop and large button
  • Threads in matching color
  • A sewing machine
This tote bag is of the right size to fit an A4 document.

That's it, feel free to drop me a message below if you have any questions about making this tote!


Copyrights © Pui Hua and Fun With Little Ones, 2012 - present. Unauthorized use and/or duplication of any materials/photos within this website without express and written permission from this blog’s author and/or owner is strictly prohibited. Excerpts and links may be used, provided that full and clear credit is given to Pui Hua and Fun With Little Ones with appropriate and specific direction to the original content