Showing posts with label Toddler Wear. Show all posts

Friday, January 4, 2013

Tutorial: Re-purpose Adult Pants into Kid's Pants 大裤换小裤


Subsequent to my earlier post on re-purposing my big guy's shorts into my little boy's trendy pants in just 45 minutes, as promised, here's the tutorial.


What you need:
- a sewing machine with matching thread color as your pants
- an adult pants to be used for re-purpose
- a kid's pants to be used as prototype
- a pair of scissor
- a fabric chalk or fabric pen
- an 1" width elastic band (according to your kid's waist length)
- some pins
- a safety pin


Ready? Lets begin now.

Pictorial Guides

1. Identify an existing pants belonging to your little one as sample. Fold the pants in half and align both pants by meeting them in the middle.


2. Draw the the outline of the pants using a fabric chalk. Cut the fabric accordingly. Remember to leave 2" on each side for seam and leave 4" on the top to give room for insertion of elastic band later.
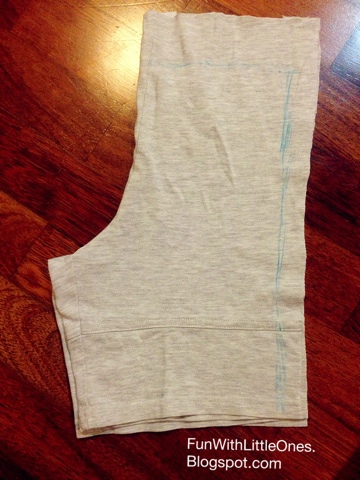


Skip step 3 if you are not sewing a pocket.

3. You have to adjust the pockets cut out according to your desired size and length, and secure them onto the pants with pins before sewing them on.


A ready pocket, useful little pocket :)
Noticed I used double stitches on all 3 sides? its to add durability.


4. Now, turn the pants to the wrong side (Inside out), sew the both sides in a straight line.


5. Hem the edges neatly using a serger, a zigzag stitch or you may use the method I used below - by making inward fold on both sides and sew them sealed.


6. Turn the pants back to the right side now, fold the waist part backward to form a waist band, approximately 2" length. Secure the waist band using pins.


7. Sew along the waist band, do not seal it completely yet! Leave a 2" gap, this is where you insert the elastic band.


8. Measure an elastic band according to your kid's waist line, insert into the waist band and pull it through using the help of a safety pin, before finally sealing it.


8. That's all, your pants is ready to wear now. Super easy isn't it! ;)


If you have any question on this tutorial, do post a comment and I'll try my best to explain.

Till then, cheers and happy weekend everyone!


Copyrights © Pui Hua and Fun With Little Ones, 2012 - present. Unauthorized use and/or duplication of any materials/photos within this website without express and written permission from this blog’s author and/or owner is strictly prohibited. Excerpts and links may be used, provided that full and clear credit is given to Pui Hua and Fun With Little Ones with appropriate and specific direction to the original content.

Wednesday, January 2, 2013

Tiered Ruffle Dress for Little Miss Sunshine 可爱叠叠裙


My itchy fingers at work again last night.

I made this fluffy 3 tier sundress for baby Claire, using 2 different shades of yellow to outline the ruffle effect. Isn't it looking sweet and delightful?


The back view. Instead of buttons or zip, I used elastic band for the back, so the dress can wear on easily without much rustling with my mighty baby girl.


It's a really fluffy dress, look at the full length when spread out... A total of 200cm was used for the bottom layer!


Oh I just can't wait to put it onto her, she will definitely look like Little Miss Sunshine or a little sunflower fairy :)

I had a similar dress when I was young, but in dark blue and light blue tone. Let me search for that picture and scan it. I am really aspired to make her a Mini Me, ain't I? *evil laugh*

I sewn on 2 yellow flower buttons on the chest front, just lovely...


As I tried the dress onto my little sunshine, it was too tight on both sides, so I made some alteration by making an opening under-arm and sewn an elastic band with a button to hold them together. Now it fits perfectly. :)


Made these bow knot hair clips few nights ago, they matches this sundress perfectly.


Interested to Try Making One Too?
Making this dress is easier than I expected, however a considerable amount of time was spent on hemming the edges of each layer. I made it without a pattern so I'm glad it turned out alright. This is definitely a break through in my sewing skill. :)

If you are attempting this for the first time, I would recommend these are some of the essential skills you should have before you begin to make a ruffled dress:


  • Ability to ruffle. Basically is to sew a loose straight line and pulling both ends to tighten the thread and create a wavy effect.

  • Ability to hem. If you do not have a machine that does serger, like me, you'll need to hem the edges of the dress properly using a zigzag pattern to avoid fray.


Here's some of the tutorials that may will be useful to any one who wants to attempt this dress.

How to sew a 3 tier ruffle dress 
How to sew ruffle by makeit-loveit.com

Happy sewing!


Copyrights © Pui Hua and Fun With Little Ones, 2012 - present. Unauthorized use and/or duplication of any materials/photos within this website without express and written permission from this blog’s author and/or owner is strictly prohibited. Excerpts and links may be used, provided that full and clear credit is given to Pui Hua and Fun With Little Ones with appropriate and specific direction to the original content.

Thursday, October 18, 2012

Quick Fix for T Shirt 快速美化童衣


My little boy is joining school field trip tomorrow and all students are required to wear their uniform for security reason - easier for teachers to spot their students. As I was getting ready his uniform for next morning, I was surprised to see small holes over the uniform! *argh*... thanks to my helper's mighty strength when washing the clothes..

Not wanting my boy to wear a "defaced" shirt I decided to do a quick fix to beautify his shirt - by sewing on few colorful balloons!


Looking cute, ain't it? :)


This was how it looked like awhile ago...

To fix up, these are the tools I used:
- Some colorful acrylic felt
- some threads and a needle (or sewing machine)
- a pair of scissors
- cut out pieces from an old shirt (to fix the torn area)

And here's how I did it...

1. First, cut a few felt into ballon shapes depending on numbers of letters to form your child's name / initial. I sew my boy's name over the balloons, I'm sure he is going to love these. :)

2. Fix the holes by sewing a small piece of replacement fabrics on the inner side of the shirt. This is to avoid further tear to the shirt in long run.

3. Sew on the balloons using threats of contrasting colors, add a string or decorate as you wish.


Now my little boy has a personalized cute looking uniform to wear for the school field trip, yay! :))

Oh... And below is the enhanced version of my baby's plain green T where I gave it a little facelift using felt again.. I love playing with pattern :)


Copyrights © Pui Hua and Fun With Little Ones, 2012 - present. Unauthorized use and/or duplication of any materials/photos within this website without express and written permission from this blog’s author and/or owner is strictly prohibited. Excerpts and links may be used, provided that full and clear credit is given to Pui Hua and Fun With Little Ones with appropriate and specific direction to the original content.

Saturday, October 13, 2012

Little Booties for My Walking Baby 可爱学步鞋


At 10.5 months old, Baby Claire is able to walk around by holding on to the back of a chair, she prefers standing and walking more than crawling now. So I spent some times to make her a few cute booties, all with well padded and non-slip soles.

These are the recent 2 completed pairs... They are far from perfect but are certainly comfortable and sweet looking. With these well fitting booties, I'm sure she is all ready to learn walking :)


Purple Bunny Baby


Lovely ribbon at the back


Decorated with tiny daisies


I made her matching hairbands too :)


Ruby Dream in Polkadots
With little felt flowers

This is to match a previous dress I made for my baby :)

Baby Claire is maneuvering around at ease in her new booties :)


Do check out the first booties I made for baby Claire here, Little Red Bunny Bootie


Copyrights © Pui Hua and Fun With Little Ones, 2012 - present. Unauthorized use and/or duplication of any materials/photos within this website without express and written permission from this blog’s author and/or owner is strictly prohibited. Excerpts and links may be used, provided that full and clear credit is given to Pui Hua and Fun With Little Ones with appropriate and specific direction to the original content.

Tuesday, September 18, 2012

Sewing Project B2: Improved Toddler Pants


After successfully making the first pair of stretchable pants for my little boy, I decided to make him another one with the same fabrics that I used for sewing a little blouse for my baby girl. See the blouse here.

Why I called this improved version? Well, it has 2 added side pockets and folded edges so looks neater and smarter than the previous one.
Toddler Pants, with side pockets and folded edge


It also comes with an elastic waist band that is neatly hidden at the back of the pants.
Stretchable waist with the button holes

However, having paid attentions to all these details, I made a big mistake - I miscalculated the waist length and when I tried to put it onto Ethan, I failed to pull the pants beyond his buttock! *argg*

I was feeling defeated for a while as I had put significant effort into this pants, it was such a frustrating moment. 2 days later, I decided to make some modification to make it fit - by adding a zipper. So, I learnt to sew zipper for the first time... and here is the outcome of the modified pants.

Added a 4" white zipper and a front button onto the pants.

The modified pants that finally fits :)


Finally, Ethan can wear this new pants made by mommy and look smart in it...Yay!


Wonder how to sew a zipper? Refer to this simple guide on Make It-Love It
http://www.makeit-loveit.com/2011/10/sewing-tips-installing-a-basic-zipper.html

Wonder how to make the side pockets? Refer to Made By Rae's post here.

Quite easy done. :)


Copyrights © Pui Hua and Fun With Little Ones, 2012 - present. Unauthorized use and/or duplication of any materials/photos  within this website without express and written permission from this blog’s author and/or owner is strictly prohibited. Excerpts and links may be used, provided that full and clear credit is given to Pui Hua and Fun With Little Ones with appropriate and specific direction to the original content.

Friday, August 31, 2012

Sewing Project B: Simple Pants for My Little Boy


Finally, I have completed the first pants for my little boy! I certainly hope he will like this. As I was making the pants he had asked me twice if he can wear his new pants already :)

Here's the outcome, looking neat?


It's a simple cutting, really. However being a newbie I made too many mistakes so there were many redos. I guess the one thing I did well is that all lines are straight and are properly aligned. *phew*

This is the pants I used as reference, I extended the length to be slightly below his knees.


I used elastic band with adjustable button holes for the waist band, so as Ethan grows I just have to re-buckle accordingly. Love this design, in fact I would think that all kids wear should adopt this concept as little fellas really grow too fast..


Now that I have learnt how to make this pants, I shall make a few more with different design variations. I just can't wait!

Ethan loving his new pants.. In fact, he was so proud of it that he requested if he can wear it to sleep for the night. *happy*


Interested to try this out yourself? Just visit this site for the step by step guide.

http://www.made-by-rae.com/2010/10/free-raes-basic-newborn-pant-sewing-pattern/

Or this

http://www.make-baby-stuff.com/baby-pants-baby-pattern.html

Happy sewing :)


Copyrights © Pui Hua and Fun With Little Ones, 2012 - present. Unauthorized use and/or duplication of any materials/photos within this website without express and written permission from this blog’s author and/or owner is strictly prohibited. Excerpts and links may be used, provided that full and clear credit is given to Pui Hua and Fun With Little Ones with appropriate and specific direction to the original content.