Thursday, October 31, 2013

Tutorial: Little Bear New Jumper Suit (Re-Purpose from Socks!)

This is a simple 10 minutes craft and absolutely no machine required. Just a soft toy of your choice, scissors, thread & needle, and a clean old sock, smell free prefer!


I will just do a super quick post, as I have to run to do my laundry soon.

Tutorial for Teddy's Jumper Suit:

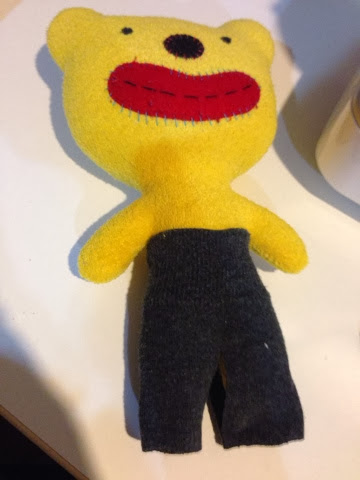
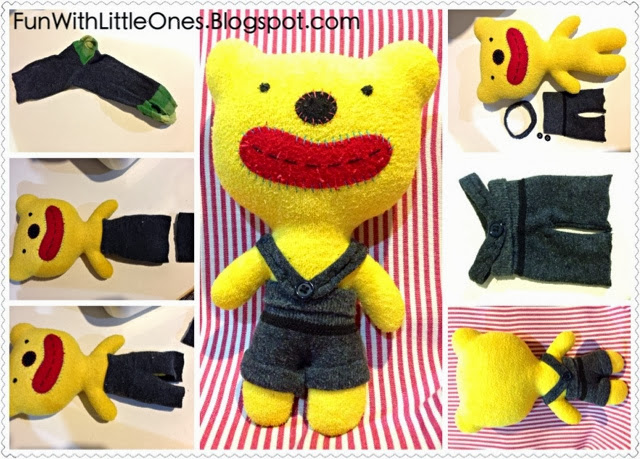
1. Find a pair of socks that still has the elasticity, wear it onto the soft toy and cut off with about 2cm extra in length.
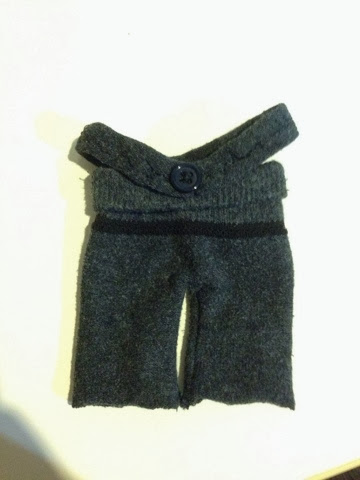
2. Slit the middle to form a pant shape. Turn the sock over and sew a "V" line to form a simple pant.


3. Next cut off about 4cm from the remaining of socks, fold half and sew both ends together to form a ring, this wil be the straps for the jumper suit. Find 2 matching buttons too.

4. Now sew the ring on to the center of the front and the back of the pants. Sew on one button each as decoration.

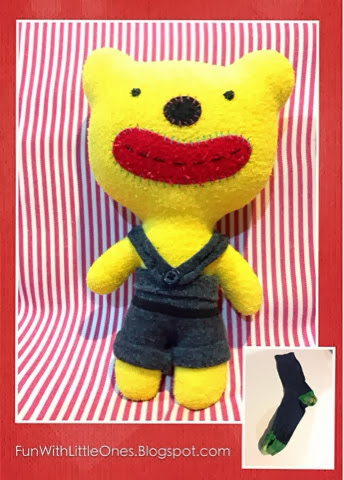
5. Teddy's jumper suit is done. Since it's for soft toy I didn't bother to hem the edges. Just wear it onto the Teddy and adjust accordingly.


Ta-Da! A smart looking Teddy is now ready for cuddle..


I hope this tutorial is easy enough to understand, after all it's a spontaneous  craft that I did not planned for.

If you like this post and would like to see more of these in future, don't forget to like our Facebook page to receive latest update on the new craft idea! ;) 


Copyrights © Pui Hua and Fun With Little Ones, 2012 - present. Unauthorized use and/or duplication of any materials/photos within this website without express and written permission from this blog’s author and/or owner is strictly prohibited. Excerpts and links may be used, provided that full and clear credit is given to Pui Hua and Fun With Little Ones with appropriate and specific direction to the original content. 


Saturday, October 26, 2013

DIY Craft: My First Shop! 小哥哥开店咯

I found some wood made fruits and vegetables for my little duo recently for them to play cooking. The duo were having so much fun playing little chef, my elder was busy taking my order, serving them while the younger sister just playing her own imaginary picnic it seemed.

The little chef decided to move the toys into his IKEA tent and opened up a store. He asked for last order before closing the shop at 5:00pm and request for payment after each meal is served. Looks like he learnt a lot during our recent trip. He even asked for my feedback, whether I like the food or not, love his professionalism spirit. :)

To make it feel more real, I made some DIY felt signages for hanging onto the tent. With this I won't have to buy him the children size kitchenette or work top, which will take up so much space at our already crowded home. 

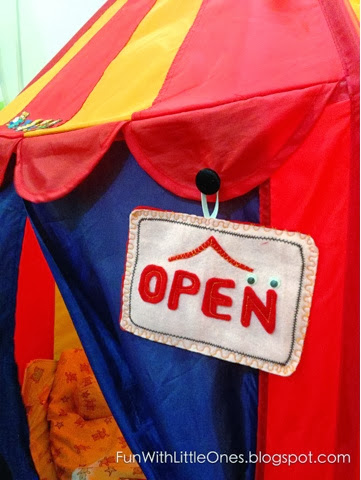
Here's the shop. We named it Ethan's Cafe. He was so proud to be the owner, he flipped the sign to "open" and took my order almost instantly.


The cafe signage was made of thick felt and attached onto the tent with a button and elastic band.

Flip it over, and it's now Ethan's Auto Repair! He loves this idea so much as he gets to operate the type of shops he likes. I am planning to make a few more signages as he develops more interest in other area

The Open and Closed signs, both with giggling eyes for that fun factor. My little girl was really fancy of these eyes.


Here are the cut fruits and veges that I got for them, there is a small round Velcro on each piece to allow them to stick to each other, and can be easily "cut" with the wooden knife come with the set.

I got these with a good discount and the duo had real good fun for the past 1 week, so I would say these are worthy investment. 


Bread plate 


Tips!
• Felt is commonly available in most craft supplies stores. They are usually sold in A4 sheet or a full yard and sewing is optional as you may use fabric glue to stick them together, I just prefer to add some stitches for the highlight effect.


If you have any queries or suggestions, feel free to post them here and I'll attempt my best to reply soonest possible.

Adios!


Copyrights © Pui Hua and Fun With Little Ones, 2012 - present. Unauthorized use and/or duplication of any materials/photos within this website without express and written permission from this blog’s author and/or owner is strictly prohibited. Excerpts and links may be used, provided that full and clear credit is given to Pui Hua and Fun With Little Ones with appropriate and specific direction to the original content

Wednesday, October 23, 2013

The Fun Bag (a.k.a. The Busy Bag)


Little ones and us just returned from a family vacation to New Zealand. It was certainly one awesome holiday for the whole family!

The flight took about 14 hours including transit, and as we planned to explore both North and South Islands on a rented car, long traveling was expected since most cities we plotted on the itinerary are quite some distance away. I knew if I want to avoid having cranky babies during the trip I had to be prepared for the long traveling, either flight, train, ferry or road trip.

I began by loading our iPad loaded with children friendly movies, that will be the ultimate fall back when everything else fails. Then I prepared a Fun Bag, or commonly known as Busy Bag, with loads of activities to keep the duo busy. 

The Fun Bag

It's a simple A5 clear zipped pouch that you can find from any stationery shop, can just chuck them into the luggage or store into the back pocket of the car seat.

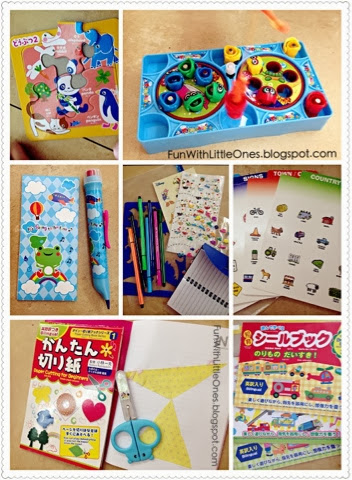
The Fun Bag is consist of individual ziplock bags filled with different games, such as below:


From top to bottom, left to right:

1. Puzzles. Simple puzzles with 6 - 24 pieces, best for restaurant stop or bedtime.

2. Magnetic Fishing game. I got this set from Daiso, the RM5 store. It is super addictive for kids!

3. 4-in-1 color pen with notepad, some how most kids love to switch colors to watch the movement (doesn't we adult love doing that sometimes too?). You can get this from any stationery shop.

4. Doodling with stencil & coloring templates. I just brought along a small notebook and let the duo mess around on the book for all they want.

5. Travel Bingo cards. This is the best game for car ride. I got this some times back, but you can still find it in some toy shop like Toy 'R Us. Look for Melissa and Doug.

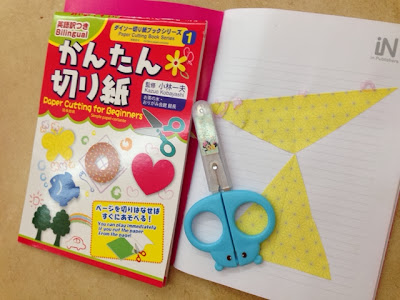
6. Paper Cutting book with blunt tip scissors. Offer some varieties of activities to keep them interested.

7. Sticker books. My girl (who was only 20 months then) had fun entertaining herself with all the stickers. Get a good quality one where they can stick & remove multiple times.

8. Short Story books. While travelling, we still insist on bedtime story book. So this is a must in our luggage. Just get shortest possible stories or the thinnest book possible. ;)

This is one of the sticker books. Can be removed and re-stick on multiple times (I got this from Daiso at RM5 each book).


The paper cutting was a fun challenge for my little 4 year old. I got a small tube of glue so he can glue his paper cut onto a notebook.

Note: Not recommended for children under 4 years old and at any time, supervision from adult is a must when using scissors.


This Fun Bag had successfully kept my duo entertained during our trip, be it during the long flight, boring wait at the airport, dining at the restaurants or winding down in hotel room. Everyday I just picked 2 different bags and kept them in my nappy bag wherever we go.  Rotating the games kept them interested.

On the other hand, I must admit the iPad was handy for the long road trip which took 3-5 hours. I designed a custom made iPad holder that can be easily strapped onto the driver or passenger head rest. It helped us to kept the duo quiet especially for the lengthy road trip. Although its just a prototype design, it's proven useful. *feeling proud*  

While driving in New Zealand was really scenic and enjoyable for the adults, it can be too tiring for the kiddos to remain seated for hours (unless of course you rent a caravan instead). 


Throughout the entire journey where we drove more than 1,500km, we had used the iPad in the car 3 times while most of the time we just sang songs, spot the objects with Travel Bingo cards or admired the views that we never had in our homeland. Old MacDonald and Marry Had A Little Lamb were sang so many times, and I'm sure you know why. *Statistically, New Zealand has more sheep than the human population..*

Before ending the post, below are some tips I would like to share when traveling with little ones:

• pick games that are light and best if doesn't take up too much storage space. You don't want to add on to your luggage weight.

avoid having SHARP OBJECTS or WOOD PRODUCTS as these may be prohibited in most airports. We brought along a blunt scissors for the paper cut and it passed all the security check after we explained it's usage.

• when having long road trip, try to have rest stop every 2-3 hours either for toilet break or to stretch the legs. It can bring unexpected fun too, for example we pulled aside by a stream to play throwing stones, picking pine cones in the woods, enjoyed a cup of warm drink at an antique cafe and had a brief picnic by the chilling seaside. These were all new experience for us and the little ones and for my elder who was 4yo then, I'm sure some of these memories will last for a long long time. 

• apart from the Fun Bag, I let the duo carried a small pouch each containing their snacks and our NAME CARDS with contact numbers (in event of emergency contact). Each day I just replenish with new snacks bought from the local stores so they can feed themselves whenever hungry or bored. 

Well, that's all folks. What I have above are just some reference, do change according to your little ones' preference. A visit to the stationery shop or toy store may gives you some ideas too.


I hope you find this post helpful and feel free to share your feedback or idea, I would love to hear from you!


Copyrights © Pui Hua and Fun With Little Ones, 2012 - present. Unauthorized use and/or duplication of any materials/photos within this website without express and written permission from this blog’s author and/or owner is strictly prohibited. Excerpts and links may be used, provided that full and clear credit is given to Pui Hua and Fun With Little Ones with appropriate and specific direction to the original content.
Tuesday, October 1, 2013

Little One's First Cooking Experience! 小哥哥初次下厨

Little Captain was always keen to help up in the kitchen since turning 2+. He has been helping to knead the cookies, whisk a batter, decorate cupcake; small chores, but often brought him tons of joy and sense of achievement. Kids of this age, says 3 to 5, loves helping up and want to be treated like a big kid, being able to do so actually boosts their confident and gives some feel-good points.

So I had been thinking to let him try out cooking, something simple so he can get a feel how it is like to handle the pan and stove. When we walked passed the kitchen supplies corner in a hypermarket, he saw the small frying pan and kept telling me those are the right size for him (at home I only have medium to large pans). Knowing that he was genuineing  interested, I helped him picked a right size pan, with heated protected handle and non stick coating.

Upon reaching home, he just couldn't wait to start cooking right away, he put on his apron, washed his hands and told me he's ready. I was so amused but did not laugh at him as that would probably put him off.

I decided to let him try making one of the simplest dishes - omelette. It's the one fail-proof dish with such simple steps:
1. cut it
2. cook it
3. flip it
4. serve it!

Here he was, learning to crack an egg, pour the milk, add seasoning and beat the egg with a kid-size whisker.

I let him cut a slice of the honey glazed ham using a butter knife and add into the egg mixture. 

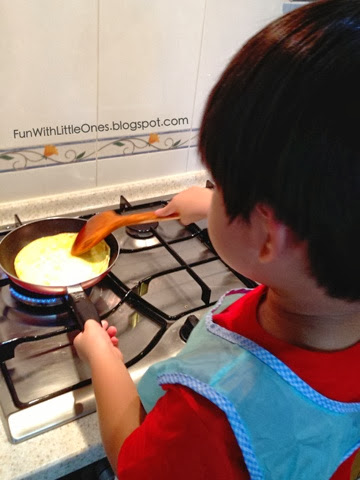
I then heat up the pan and pour the oil for him, it's too dangerous for him to handle fire and gas yet. However I let him poured the egg mixture and count 20x before flipping it.


It's not easy to refrain him from poking the omelette with the spatula before it's ready, but I let him be since it's part of learning. Eventually I helped him to flip the omelette after few tries without success. Asked him to count another 20x before transferring the omelette onto a plate.


Ta-da, the omelette is done! Easy peasy, as my little Captain said it.

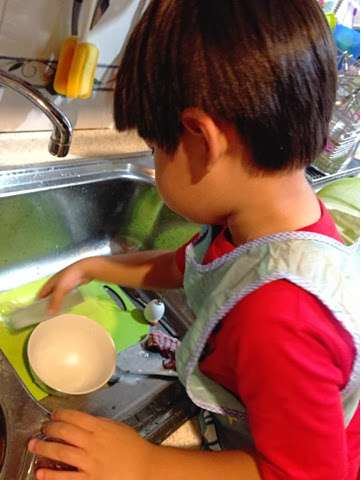
The lesson did not end here.. I let him wash up after cooking (just the bowl and whisker, not the pan and knife), and clean up his hands properly.


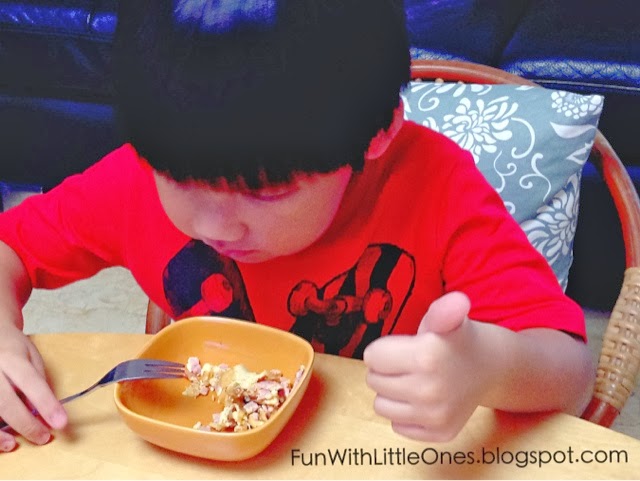
Finally, he got to enjoy his own cooked omelette. You can bet how happy and satisfied he was although it's such a simple food. 


So, what is the motive of teaching a little boy to cook? Some may ponder, especially for the male friends who think cooking is a girl's thing.

Well, cooking is an essential skill in life since we eat everyday.  Most importantly, learning the cooking process has several benefits as I see it:

• learn to understand instructions and execute them in the right order. This trains good communication and understanding skills which are 2 of the key skills required to excel in school or work.

• understanding the complexity of cooking lets them appreciate the food better. They know hardwork is involved in producing the yummy food on the table and will not be wasteful on food.

• understand how things work and learn to be independent. I once had a girl friend who did not knew that she had to pour oil before frying an egg, and she was 13 then. I would very much like my little ones to be able to do things on their own instead of being dependant on others all the time. So supervised cooking provides a good learning ground.


Important!
• Please note that real cooking has its danger, eg risk of getting burn or cut, so 100% adult supervision is required and I would strongly recommend to do this only when you are certain that your little one is ready.

• Besides be prepared to cook at 2x slower speed and you may have 2x cleaning up to do too. I'm not joking about this..

• To ensure food hygiene, make sure little ones wash their hands and wear an apron while working on the food.


That's all folks, do let me know your cooking experience with your little ones too.., I'll be interested to know. *wink*