No pattern available for download as I drafted it using one of her ready-made dresses. In total it took me about 3+ hours to complete the whole dress, not a very difficult piece but would require some basic in sewing and handling tulle fabric, which is not so forgiving on stitching mistakes.

The materials needed:
The Making
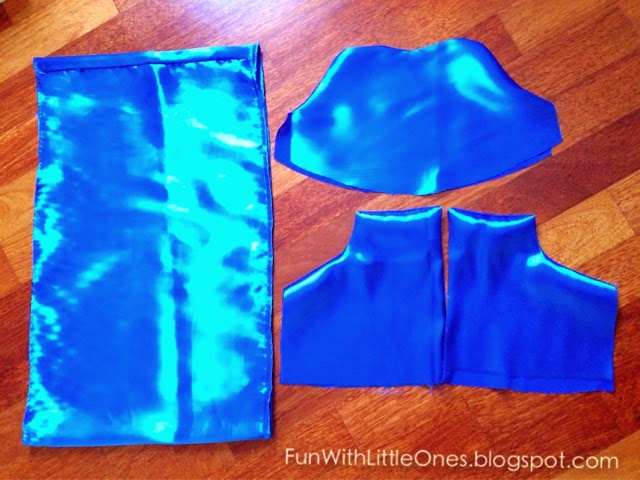
1. First, cut all the pieces:
- 1 1/2 yard of satin fabric (for bodice & skirt)
- 1/2 yard of lining cotton fabric (for bodice)
- 2 yard of tulle fabric (for skirt)
- 3 matching buttons
- 2 2" thin elastic
- Sewing machine and matching threads
Note: all measurement is based on closest approximate as I was using leftover fabric without measuring.
1. First, cut all the pieces:
• 1 set front bodice (satin & lining fabric) - refer 1
• 2 sets back bodice (satin & lining fabric) - refer 2
• 1 set skirt (satin & tulle fabric, lining not required) - refer 3a & 3b


Just a Tip..
When ironing the satin fabric, I would recommend you to iron it from the reverse side (non shiny) to avoid risk of leaving a burnt mark on the fabric.
2. The sew the top bodice pieces with the lining; sew the tulle fabric onto the skirt using the longest stitching length (you may want to check your machine's manual), then pull both ends of the thread to gather the skirts.
To create ruffle effect for the tulle skirt, remember to cut the skirt fabric at least 50% longer than the bodice. Hence the ratio of bodice to tulle skirt should be 1:1.5.
3. Press all the pieces with warm iron (this is one important step not to be missed!).
4. Attach the front & back bodice on the side, with right sides facing. Sew and serge around the raw edges.
5. Using fabric pins, attach the tulle & skirt to the bodice, again with right side facing. Serge around the raw edge to avoid fray.
If you are uncertain how to make this step, don't worry.. Ashley from Make it & Love It have a great tutorial on how to make and attach gathered/ruffled fabric.
6. Now the skirt is 80% done. Attach 2 rectangular tulle as shoulder straps. You may want to try it onto your girl at this stage to ensure its of the right length.
7. For the cape, I just used 1/2 yard of tulle fabric, serge the edges and attach the elastic loops on top corners to form a "U" shape, so it can easily hook onto a button.
8. Add on the embellishments, the buttons and ta-da... we are done!
I made the covered fabric button using the toolkit bought from Daiso, it's really easy to use. You can check out the previous post here.
This picture basically sums it all.
The simple, elegant Princess Elsa dress for the little girls we love. Please please do share if you have make a similar dress too.. I would love to hear from you! ;)
Just a Tip..
When ironing the satin fabric, I would recommend you to iron it from the reverse side (non shiny) to avoid risk of leaving a burnt mark on the fabric.
Copyrights © Pui Hua and Fun With Little Ones, 2012 - present. Unauthorized use and/or duplication of any materials/photos within this website without express and written permission from this blog’s author and/or owner is strictly prohibited. Excerpts and links may be used, provided that full and clear credit is given to Pui Hua and Fun With Little Ones with appropriate and specific direction to the original content.
No comments:
Post a Comment