Saturday, November 30, 2013

Tutorial: DIY Christmas Felt Tree 圣诞树制作流程

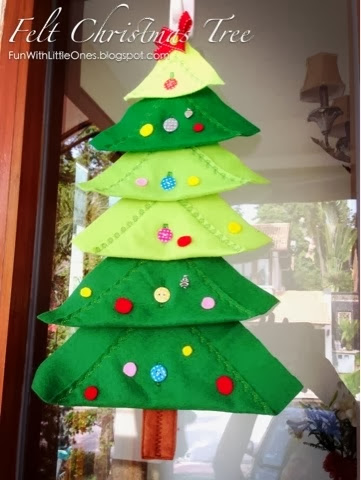
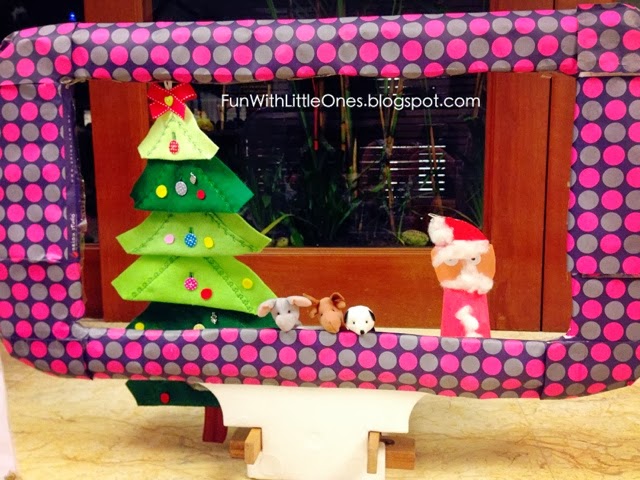
My little boy really adores the Christmas tree I made for them this Christmas. He used it for his theater show, practiced his button / unbuttoning skill and had fun shuffling the different layers around to see how it looks like. When they got bored of playing, I just hang it up on the front door or door handle. Easy!

It's easy to make and is relatively low cost, worth giving it a try. However, do note that a sewing machine is required since button holes are involved.


Using it for the puppet theater show, with the little Santa made of paper cup!

Learning to button and unbutton.

Reading to start sewing? Here's how..

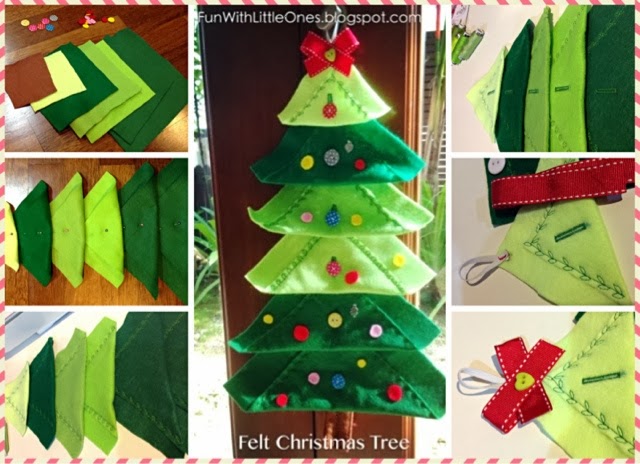
Tutorial: Felt Christmas Tree 

Materials you need:
• 6 pieces of square shape felt in different shades of green, cut each one 1" smaller.
• 1 piece rectangular brown felt for tree trunk
• 6+1 buttons
• 12cm red ribbons
• 8cm elastic band  (1cm thickness)
• Needle and thread in matching color
• A pair of scissor
• Sewing machine 


The making:
1. Cut the felts accordingly and decide on the buttons that you want to use. You should have 6 green pieces (or less) for the tree and 1 brown piece for the trunk.

2. Fold each green piece backward to form a triangle shape, then pin them in place using fabric pins.

3. Sew each green pieces into triangular shape using straight or curvy lines, and sew the brown piece in half to form a rectangular shape.

4. Using the sewing machine, sew the button holes in the middle of each triangular piece, about 1" from the edge. Then sew a button each onto the middle top of the triangular piece & brown rectangular piece too. You shall have a functional "tree" now.

5. Using a needle and thread, sew the elastic band to form a loop over the top of the smallest triangle piece. This will be used as a loop to hook your tree, so ensure you keep it secure.

6. Tie the ribbon like an "X", the sew it over the base of the loop. Sew a cute button over it, or leave it as it.

That's it, your little felt Christmas tree is done. Now, go and surprise your little one and watch their reaction. :)

Feel free to drop me a question if you have any, or share with me what you have made for your little ones this Christmas, or just simply pop a line so I know someone is indeed interest in this post. 

Till then, happy preparing for Christmas! (I can't wait to start working on the next craft project!)


Copyrights © Pui Hua and Fun With Little Ones, 2012 - present. Unauthorized use and/or duplication of any materials/photos within this website without express and written permission from this blog’s author and/or owner is strictly prohibited. Excerpts and links may be used, provided that full and clear credit is given to Pui Hua and Fun With Little Ones with appropriate and specific direction to the original content


December is Here..

December has finally arrived, which  marks the end of my career break, time to get back to the serious stuff and face the horrible traffic jam in the heart of the city. It feels like entering a new job again except that I knew almost everyone at work (I was on a sabbatical break).

It has been a meaningful time-off, managed to resolve most matters that I intended to for taking this break. A week back, a friend asked me if I am used to being a stay-at-home-mom and my reply was simple, "it is the best time of my life". And I really meant it. 

Although I have been posting only happy moments onto my page, these few months had not been all rosy, many unexpected / unwanted events happened but I decided to move on. Happy or sad, we have to move on, so why not do it with a positive attitude. Complaining doesn't resolve issues, only action does. You wouldn't believe how much hurdles I encountered, that I nearly thought God was putting me to test. But thank God, all well ends well and things are restored to order, somewhat.

So despite some personal & family matters that I shall not disclose, what have I managed to achieve as an individual for this period? 

• Firstly, and what I am feeling proud of, is that I have proven than I can be a fulltime homemaker managing the home, the kids and the family without any helper (and maintaining my sanity). At the same time still managed to find time to read, teach (the kids), craft, blog, bake and catch up with the family and friends. My duo enjoyed the best of their mommy and together we did so much fun and wonderful explorations. Even the principal at Little Captain's preschool told me all the teachers noticed the change in him, where his confidence grew, he laugh a lot and he showed great enthusiasm in everything he does at school. He did so well for the school concert that he was placed in the center stage for almost every piece of presentation, despite he was the youngest in his class. Secretly he requested me to sit closer to stage during the concert day so I can watch him perform without being blocked, he was determined to put up a good show.

So, seriously, never under estimate the power of mommy's love on the child. For this, I'm envious to all the stay home moms.


• Secondly, I finally started my own label, Pea Hatch Kids Store, to market my designed pieces. I managed to make and sell more than a dozen of my handmade to several fans / customers. For that, I feel truly blessed and thankful that I can realize my dream of being a kids fashion designer which I used to joke about with my friends. Although it's such a small scale, it feels good to have people who appreciate your hard work.

Wait a minute, you are not aware I have my personal brand? Now do go check it out at peahatch.blogspot.com!


• Thirdly, I get to spend more quality time with the families, especially my old pa and ma who are not so young anymore and whose health are slowly deterioting. Spending each day with them is a blessing to me and my little ones. I can always work harder to earn more monies, but I will never be able to buy them their health and youth. 


• Lastly... I get to do quite a fair bit of spring cleaning and gotten rid of most baby clothes, toys, maternity clothes and even my Uni books; mostly donated to the needy ones, few sold. This has always been on my to-do list and I finally finally got it done! I even squeezed in some times to do some home improvement projects and gardening to make our home, a real comfy home.

I actually make a checklist of top 10 things I want to achieve during this break, I managed to complete 6 out of 10, plus some extras that were not listed in the first place. So, not too bad after all. :) 


Anyway, I am now all geared up and ready to put on my armor again. My duo will definitely miss the mommy who will no longer be around 24x7, but I have made necessary preparation to help them adjust to the new routine, and it is time we resume to the "real" life. So, once again I pray that God will bless us bountifully and that my little ones will continue to be their happy, usual self. Amen.


Note for the Readers..

Thank you for supporting this blog, I sincerely hope the posts had not bored you so far and you may find a thing or two that interest you. I may be less active moving forward but will do my best to keep this blog going.

Friday, November 29, 2013

Little DIY Felt Christmas Tree (handy toy too!)
It's the time of the year again, the Christmas tree is setup, presents are wrapped up, kids are in the holiday mood and radio playing the jingle songs.

Instead of just the usual 6ft Christmas tree which we have been using for past few years (it was up since mid of November!), I've decided to make a smaller versin Christmas tree to hang up at the entrance to welcome our guests this time.

So I made this.

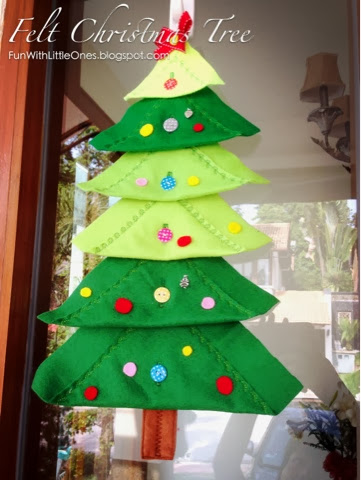
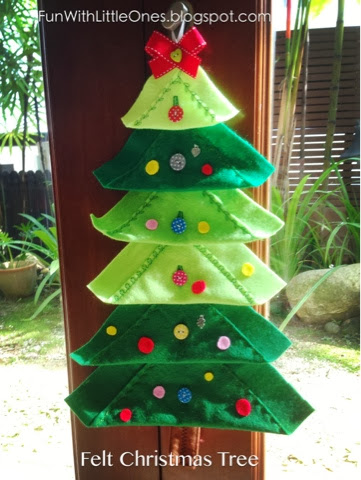
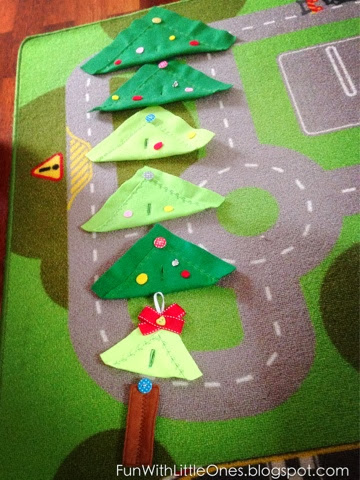
A 6-tiers Felt Christmas tree, joint together with polkadot candy buttons. My little boy was happily playing with it, buckling and unbuckling, arranging them in sequence of size, and finally helped me hang it up where it's supposed to be.


I designed it with 2 purposes in mind. One, as a Christmas ornament as it should be, and Two, as a sensory toy for my little girl to learn to handle buttons, and sorting with sizes. I got the idea from the Montessori toys I saw and thought I can make something pretty out of my stash of felt which I bought for the Convertible  PlayHouse I made for my little captain last Christmas. Check out he playhouse here!

The tree is consists of 4 different shades of green, the height of the tree is easily adjustable by reducing the layers.


Noticed the little charms I put onto the tree? These are tiny treasure hunts for my duo. :)

I shall post up a tutorial soon, the making is rather easy and the fact that it is reusable and can be easily stack up for storage, makes it a perfect Christmas  gift.

*Updated*
Yippie, the tutorial is available now!

This shall be the very first Christmas gift I made for our home, and I'm sure it will continue to beautify our home for many more Christmas to come!

And here are the little Christmas trees we made for the ones we love, they will be sent out with the Christmas cards. Decorated with buttons, charms and filled with lots of warm wishes from the little one and us.


Ho, Ho, Ho... Are you ready for Christmas? We sure are!


Copyrights © Pui Hua and Fun With Little Ones, 2012 - present. Unauthorized use and/or duplication of any materials/photos within this website without express and written permission from this blog’s author and/or owner is strictly prohibited. Excerpts and links may be used, provided that full and clear credit is given to Pui Hua and Fun With Little Ones with appropriate and specific direction to the original content. 

Sunday, November 24, 2013

My Little Bunny Turned 2 (Rainbow Party!)

My little girl turns 2 finally. From the little newborn who always cried for more milk in the late night to the fine little toddler who loves dancing, singing, drawing, playing today, we had come a long way. Motherhood is truly a blessing and I enjoyed every single bit of it.

To celebrate her special day, we decided to organize a small party for her to have fun with the little friends, lucky for us that our closed friends' kids are of the same age group.

The theme was RAINBOW, and how the kiddos love this colorful theme! From food to deco to dress, it was a real rainbow party thru and thru, and let me show you how we made that happen... 


THE DRESS

My little bunny loved her rainbow party dress so much that she was so excited to show it to her grandma right after shower, kept shouting "look at me! Look at me!". First time she wore a princess dress, so I supposed that made her felt really special to be princess for a day. I was toying the thought of cutting the dress to knee length but I'm glad I did not, it looked just perfect on her, isn't it? (Say yes please...)

Roaming around the garden in her rainbow dress, like a little fairy..

Sinking her face into the soft tulle...


For the brother, he too wore a colorful checked shirt and a white bottom. So the siblings were a good rainbow team. :)

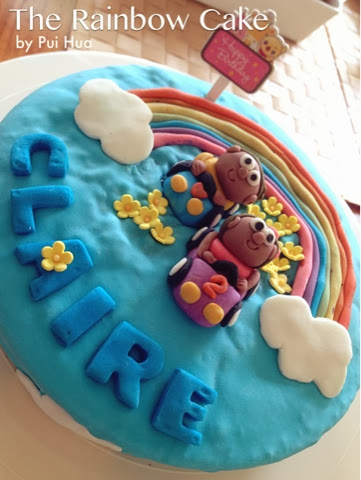
Here's the rainbow birthday cake that I baked for her birthday, a moist chocolate cake with rainbow fondant design. I'm no cake deco expert but I tried, it wasn't perfect but was good enough for my kiddos. And that is good enough for me :)

The rainbow cake for my little Bunny

This cake was such a hit with all the kids, especially the 2 little figurines, I purposely arranged in such a way that the elder brother is at the back, always there to look after his little sister.

Here is another cake I baked for her next day celebration at the school... A magical snowman in a clock, with lots of magical snow balls. It's such a relief that both cakes turned out well.. 

The snowman cake

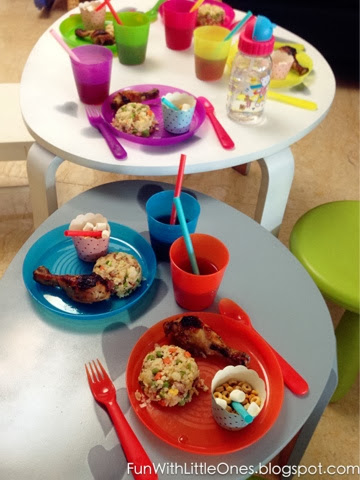
The food & fruits specially prepared for the little ones. These cutlery sets are available at IKEA stores, love their vibrant colors. Both adults and kiddos loved the fruit sticks, it's really easy and was fun to make.
The rainbow party!

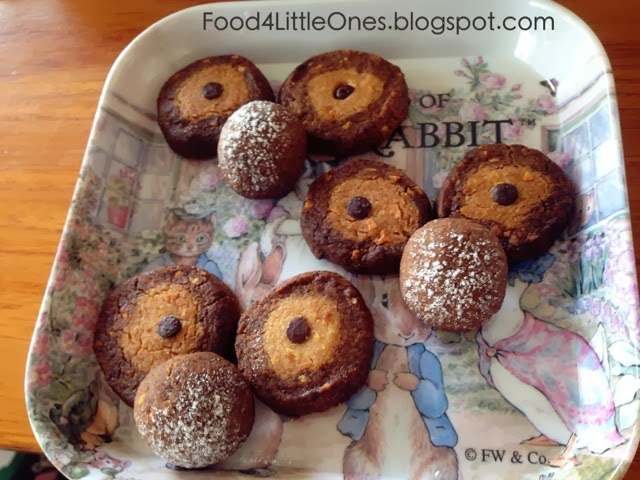
The little Monster Eye cookies served as snack, edible fun. Recipe available on my food blog, Food 4 Little Ones, here.


THE GAMES 

I prepared few mini games that are suitable for kids age 2-5yo, these are real ice breakers, all the kids were laughing and jumping and became good friends right after the sessions.

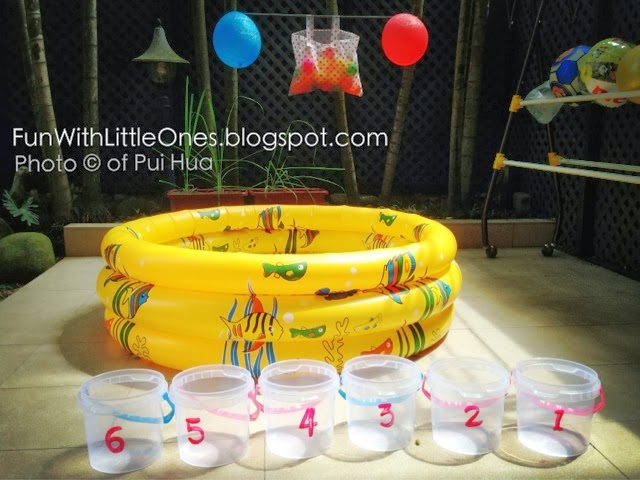
Game #1 - Scoop the Balls
Have each of them a bucket, tossed lots of plastic balls into the mini wading pool, whoever scope the most balls when I blow the horn wins a small present.


The kids really put their 100% into the game, and the mommies too. 


Game #2 - Aim 'n Shoot!
Using the same buckets and balls above, I changed the game plan where the buckets were placed on the floor in a row, the little ones have to aim and toss their balls into the bucket. Again, winner takes the prize. 

I just prepared many small prizes so no one left empty handed, you will be amazed how they love little pressies. It's a blessing to see all the kids in such high spirit and have the house filled with so much laughter.


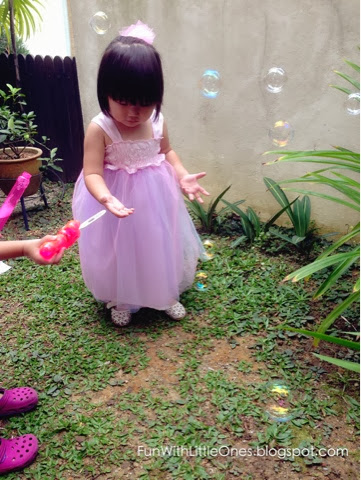
Game #3 - Pop the Bubbles
Just gave each of them a tube and watched them enjoying themselves. Kids and bubbles always work, it's a chemistry that science can't explain.


THE DECO

I didn't really snap any picture of the deco as I was too involved catching up with my friends and playing with the kids, but there were balloons in rainbow colors to welcome the guest, a rainbow pinwheel, rainbow colored party bags and a Happy birthday garland which I totally forgotten to hang up. But does it matter? No no,not at all, everyone had fun and that is what that matters!

Little pinwheel welcoming the guests.


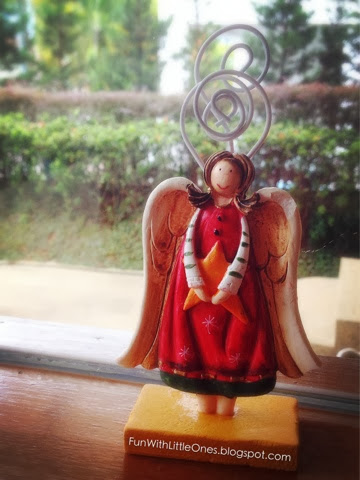
Little angel with a star. I told myself not to buy anymore Christmas deco but this just look so much like my little bunny.


Do you know there is a really fun way to blow up the balloons? You may read more about the science experienment we had while making the fizzy balloons here! ;)   

This was the kids' table filled with simple healthy meal, noticed those refurbished heart print table? My very amature paint job :)


IN CONCLUSION...

It was such a fun day full of excitement for the little ones, my duo were so thrilled and thoroughly enjoyed the food & companion of little friends. My little boy actually thanked me and gave me a big hug at the end of the party for "putting up such a great party", exactly as how he said it. 

It took quite a fair bit of effort to plan and execute without involment of any party planner (a big THANK YOU to the grandma for her delicious dishes!)  but it was a wonderful party that didn't burn our pockets, and best of all my kiddos got to be involved along the progress, from cake decorating, party bag packing to beautifying our home. Good bonding & learning experience in doing all the chores.

Besides, we had a bunch of very happy kids, a very proud birthday girl and a house filled with bubbly laughters the whole afternoon, that positive energy will linger on for days and both siblings shared a wonderful memory with us.

So, will we do this again the next year? You bet we would! That is all about our Rainbow party, thanks for reading such a long post.


Copyrights © Pui Hua and Fun With Little Ones, 2012 - present. Unauthorized use and/or duplication of any materials/photos within this website without express and written permission from this blog’s author and/or owner is strictly prohibited. Excerpts and links may be used, provided that full and clear credit is given to Pui Hua and Fun With Little Ones with appropriate and specific direction to the original content. 


Saturday, November 23, 2013

Funny Science... Fizzy Balloons!

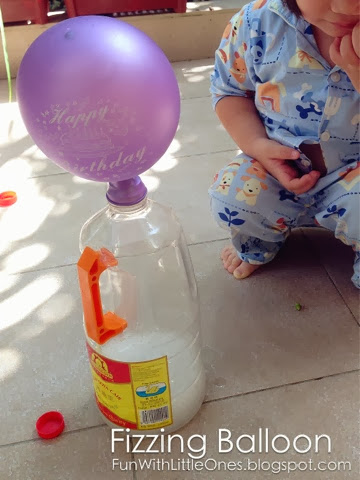
We're doing some simple deco for the party, rainbow colored balloons are one of them. Instead of blowing the balloons we decided to have fun science experienment, using baking soda and vinegar.

When you put the two ingredients together they generate carbon dioxides, which then fill up the ballon. Same technique is applied to making school volcano project (learnt that when watching Art Attack!)

It's easy, all you need is:
• big cup of vineger (I used rice vineger)
• few teaspons of baking soda
• a used milk container (I would suggest to use a smaller container next time)  
• a funnel


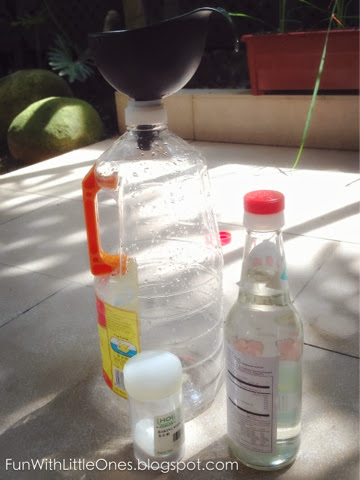
The ingredients & tools. Fill the vineger in the empty container and add few teaspoons of baking powder into each balloons using the funnel. Drop the soda into the vineger once you have the balloon secured onto the opening of the container.


The duo anxiously watching the balloon expanding...


Perhaps the soda I used had been kept too long, the mixture did not create enough gas to fill up the balloons, but still we had some good laugh. The duo were super excited when they heard the fizzy sound and kept chanting "ballon grow! Ballon grow!" as they watched the balloon expand.

What's a party without some pretty balloons? We made 2 dozen of them in rainbow colors, consistent with the birthday theme.


Perhaps next time we may consider making volcano instead, who knows? :) thanks to this site that gave the idea on this fun activity http://www.icanteachmychild.com/2012/05/fizzy-balloons/


Copyrights © Pui Hua and Fun With Little Ones, 2012 - present. Unauthorized use and/or duplication of any materials/photos within this website without express and written permission from this blog’s author and/or owner is strictly prohibited. Excerpts and links may be used, provided that full and clear credit is given to Pui Hua and Fun With Little Ones with appropriate and specific direction to the original content.


Tuesday, November 19, 2013

Grow a Plant: The Magical Beans!

I do not have green hands, plants I tried to grow when we stayed in condominium often ended up drying and eventually died. Even we have moved to landed few years back, we have people who helped to take care of our lush gardens. Until recently that I started my interim career break, I decided to take up the gardening myself and even bold enough to try planting some vegetables and flowers.

Why give myself such challenge? You may wonder. 

Well, first of all I would like my kiddos to understand and respect the livings and the wonder of our Mother Earth. like to proof that I am not poison Ivy and I CAN really grow something without killing them.. 

So among my picks, are these little French beans. They grew so fast that amazed all of us, including my little captain, who excitedly check up the growth every morning and reports to the father.


There was nothing in the first 2 days. I prepared the soil, some red soil with composed organic soil, dug 5 holes about 1" deep each 2" apart, then dropped 5 beans into each hole, covered up and follow by some water. Then I left them under the sun, with a netting over to protect them from birds.

On day 3, there's where the surprise came. They sprout! Some tiny purplebean stouts popped out from the soil.

On day 4, the purple shell dropped, they have now grew 2cm taller, within just a day!

On day 6, continued to grow at such an amazing pace! I got few gardening poles to give each of them the much needed support later. Sprinkled some organic fertilizer to give them the extra nutrition too (since I grow them in a pot instead of on the ground) 

On day 15, they are starting to creep up the pole, one couldn't made it probably I injured the root as I shifted some of these plants. Soon I will need to tie up a horizontal pole for the stem to grow side ways instead of up up up (to the sky? I wish!)

The printing on the packaging says it will be ready for harvest in 2-3 months, so we shall see.

As I am resuming work next week, I hope I can continue to find time to care after these little plants and gather our harvest one day..

Sunday, November 17, 2013

Lego Art: the Giant Rubber Duck is In Town!

Most of us read about the 50-foot tall inflatable giant rubber duck, brainchild of Dutch artist Florentijn Hofman that has made its appearance in many countries, including Hong Kong, China, Japan, Sydney, Pittsburg , but not Malaysia. It's arrival in any of these cities made it such a hot attraction for locals and tourists, hope I wish it comes to malaysia so little ones can see their favorite bath toy in the giant form.

Here are some photos of this giant cutie, from respective websites.

In Hong Kong harbor


Photo courtesy of Time Newsfeed


In Osaka 

Photo courtesy of project Haruhi


In Pittsburg


Photo courtesy of Pittsburgh Magazine


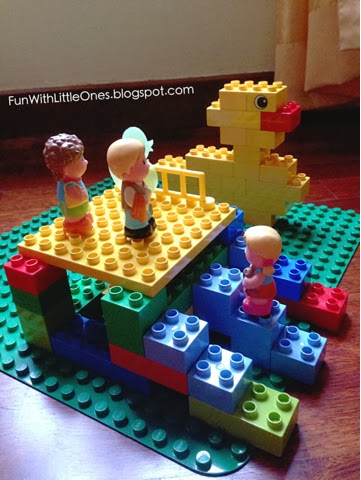
And here is our very own Malaysia version, err... Using Lego blocks :)

Look, the giant rubber duck!

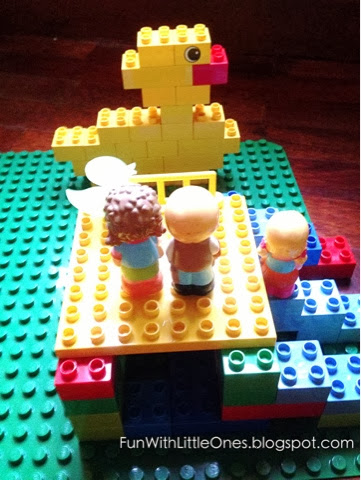
Awh... Isn't it cute?


Let's sail away with the duck!


Just random creation during our Lego play time, not the best kind but it was certainly fun. :) my little handsome really liked this replica of the rubber duck, kept laughing as he moved the little figurine around, we shall make something fun again soon! 


Copyrights © Pui Hua and Fun With Little Ones, 2012 - present. Unauthorized use and/or duplication of any materials/photos within this website without express and written permission from this blog’s author and/or owner is strictly prohibited. Excerpts and links may be used, provided that full and clear credit is given to Pui Hua and Fun With Little Ones with appropriate and specific direction to the original content. 

Saturday, November 16, 2013

Me & Mini Me: The Origami Dress!

It's been a while since I last made the mommy & daughter dresses for both of us, there is just too many things that kept me busy ever since my sabbatical leave started. Anyway, inspiration strike on one sleepless night, so I dug out the long forgotten fabric and started sewing right away.

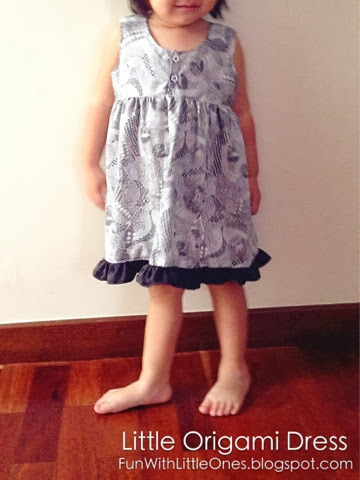
One dress a night, and here are the outcomes - the Origami dresses, tailored made for both of us. :)


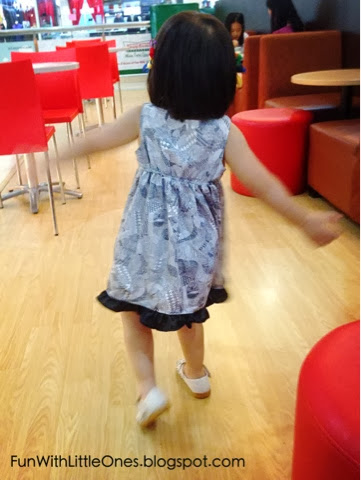
I really like this print, it's simple black and white in perfect harmony. I bough this fabric not long after I picked up sewing as a hobby, which was about a year ago, I'm just glad I finally made something decent out of it.

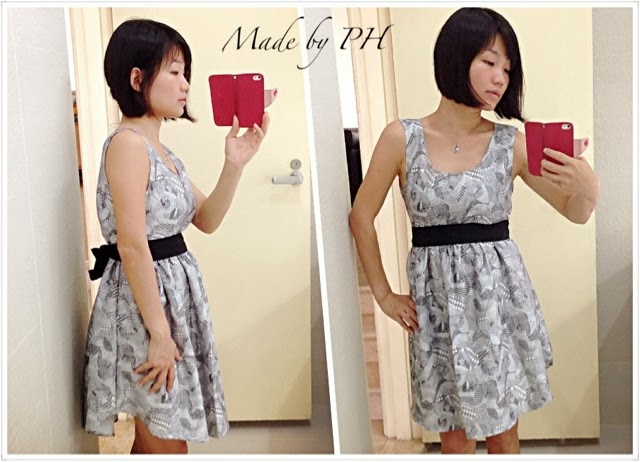
Both dresses use elastic bands on the waist line for easy fit on, no zip required. I added the simple ruffle effect for my little girl's dress although the dress looked good as-is, I just wanted a band of black to be consistent with my dress, where I used an existing black fabric belt for better visual effect:

So, simple black & white can looks sweet on little one too.

Dance, baby, dance.. I can watch her dance while day.

My first self-designed dinner dress, not perfect but I like it. :)

Posing minutes after the dress was completed, I was too excited so please pardon me.. 


This is the 5th of the Me & Mini Me series, and my personal favorite by far... You can check out previous series here.


Thanks for stopping by my humble blog, feel free to drop me a message and I certainly welcome any constructive feedback!


Copyrights © Pui Hua and Fun With Little Ones, 2012 - present. Unauthorized use and/or duplication of any materials/photos within this website without express and written permission from this blog’s author and/or owner is strictly prohibited. Excerpts and links may be used, provided that full and clear credit is given to Pui Hua and Fun With Little Ones with appropriate and specific direction to the original content


Monday, November 11, 2013

Tutorial: Tulle Flower Hair Pin (Part 2 of her Fairy Tutu Dress)

I mentioned I wanted to make a matching hairband for my little girl's birthday rainbow dress. Well, I changed my mind. Made her this instead.

You may check out the dress here


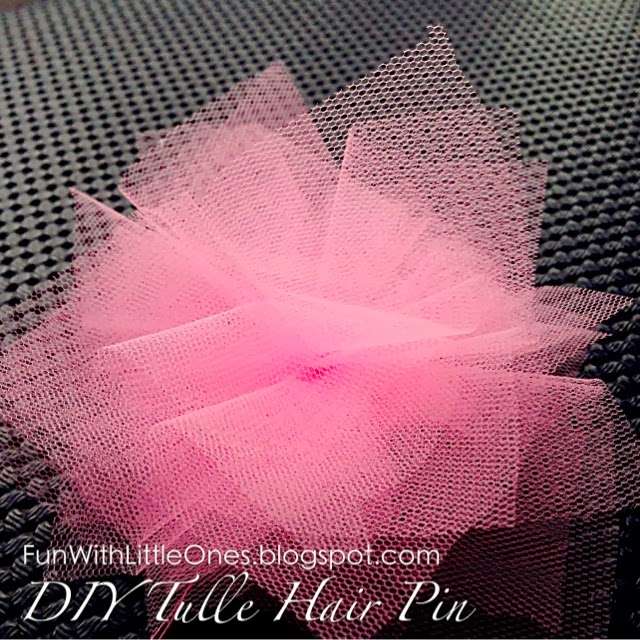
A tulle flower hair pin. 

Easier to wear on since it's really light, easier to style too, can pin on the hair as-is or ontop her pony tail. 

The making is rather simple, no machine nor sewing experience required. All you need is these:

• 12 pieces of square tulle fabric
• a small square felt in matching color
• thread and needle
• an alligator hair pin 
• fabric glue or all purpose glue 


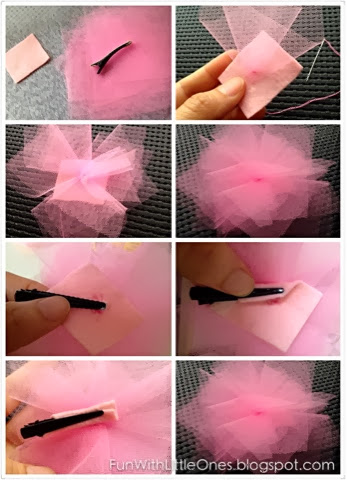
1. Cut the tulle and felt into desired size.
2. Fold the tulle into quarter, then sew onto the center of the felt piece.
2. Continue sewing the remaining tulle pieces in the same manner in a circular motion, make sure each piece overlap slightly (about 1cm).
5. Glue on the felt onto the top of the pin.
6. Fold the felt into the back of the alligator pin and glue on. 
7. Let dry and that's it, you have a beautiful tulle flower pin!


This is so fun to make, I may just make a few more if time permits. You may use the same method to make a tulle flowe hair band too. *wink*


Happy crafting peeps!


Copyrights © Pui Hua and Fun With Little Ones, 2012 - present. Unauthorized use and/or duplication of any materials/photos within this website without express and written permission from this blog’s author and/or owner is strictly prohibited. Excerpts and links may be used, provided that full and clear credit is given to Pui Hua and Fun With Little Ones with appropriate and specific direction to the original content

Tuesday, November 5, 2013

The Rainbow Fairy Birthday Dress

My little girl is turning 2 soon, it will mark a major milestone as we are sending her to the preschool, hopefully she is ready for the change of environment. At 23 months old now, she is speaking fluently, knows her manner (love the way she says thank you and you're welcome!) and fully potty trained, although she fights with the elder brother often, they love each other and she learns a lot through mimicking her brother. Blessed, we are.

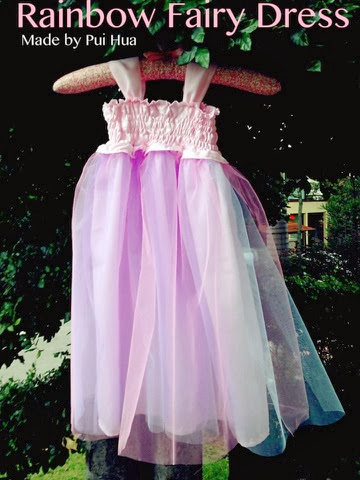
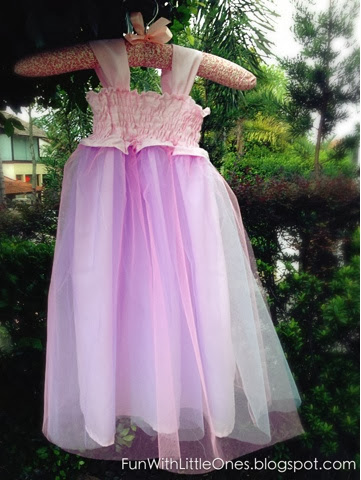
Anyway, to celebrate her coming birthday, I'm planning to throw a small party for her, just with closed family and few good friends and their kids. The theme this year will be RAINBOW, so I started off by making her a rainbow fairy dress, which is actually a maxi tutu dress.


I know it's not exactly a rainbow dress as it only havs 3 out of the 7 spectrums (blue, indigo, violet), but anymore layer it will be too fluffy for her to walk. So let's just stick to 3 layers, shall we? 

I have yet to try this dress on her, kind of curious to know how this will looks on her and whether it will fit well. I made this dress without pattern, just using an existing store bought dress as prototype and start cutting and sewing after having the design in mind. It turned out alright (in my humble opinion as the designer :), somehow the shirring effect is not as beautiful as the previous dresses I've made for her, the final outlook is still acceptable. My little girl gave me a big wow when she saw this dress in the morning and told me "I like this!", so at least I am certain that she likes it. :) 

Next,I will think of an hair accessories to match this dress, she doesn't like hair band so I have to figures out something else... We'll, we shall see. This sleepy mind can use a good sleep now before it can thinks clearly again.

Good night! 


*UPDATED* 
The dress fitted well and looked fabulous on her, check out my little bunny's big day here.. I have also made her a tulle flower hair pin to match the dress, check out the tutorial here, it's so easy that it is a waste not to make one. ;)


Copyrights © Pui Hua and Fun With Little Ones, 2012 - present. Unauthorized use and/or duplication of any materials/photos within this website without express and written permission from this blog’s author and/or owner is strictly prohibited. Excerpts and links may be used, provided that full and clear credit is given to Pui Hua and Fun With Little Ones with appropriate and specific direction to the original content

Sunday, November 3, 2013

Grow a Plant: Home Grown Vegetables
Last August, little captain and I planted some sunflowers and till today he still remembers it. From that experience, he learnt the responsibility of caring after a life, and that sun, water and fresh air are essential for the living plants. You may read more about it here, http://funwithlittleones.blogspot.com/2012/08/grow-plant-together.html.

Now that I have some times at home, I decided to start planting some edible vegetables instead, on top of the herbs we already have. We can have some fresh veges and little one can learn a thing or two about gardening (not that I know a lot, but at least i am giving it a try..)

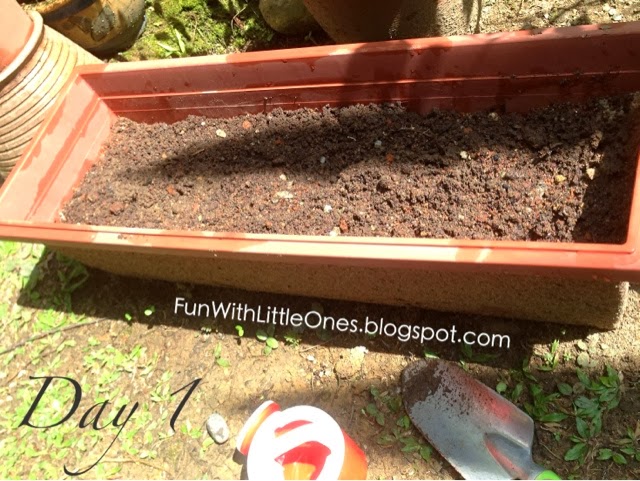
So here is the pot we used filled with some black soil (mixed with composed, bought from nursery). We loosened the soil with a spade, sprinkled some seeds randomly and watered sparingly.
Some of the seeds we got. Planning to get more pots once we have success in the baby Pak Choy.

Day 2.
Nothing, absolutely nothing.

Day 3.
After the evening rain the day before, we noticed a lot of saplings sprouting! The joy of new life. 

Day 4.
I re-planted some of the plants to give adequate space to grow, and added a layer of netting to protect them from birds  that are frequent patrons in our garden. Little one helped to water and search for stones to serve as weight for the net.


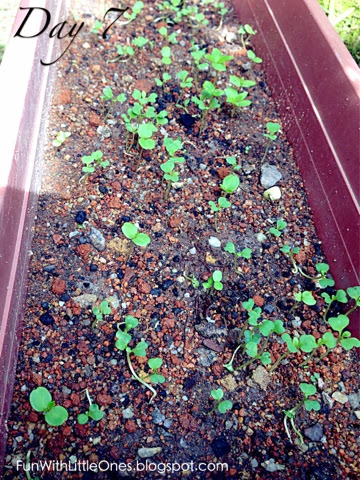
Day 7
They had grown slightly. Time to put some organic fertilizer...

In the meanwhile, I planted a pot of Kai Lan and some Salvia seeds in the garden too. Will these little plants survived and eventually grow into beautiful green veges or flowers? We certainly hope so!

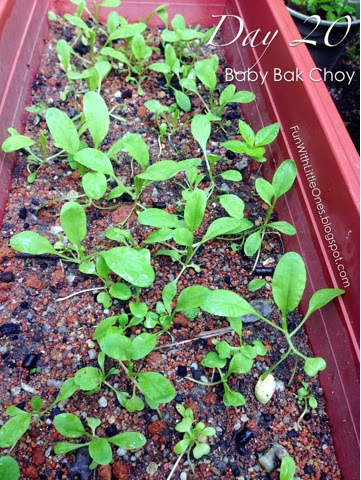
Latest update on day 20 (+- 2 days), looking good, aren't they?


 Look up for more updates!


Copyrights © Pui Hua and Fun With Little Ones, 2012 - present. Unauthorized use and/or duplication of any materials/photos within this website without express and written permission from this blog’s author and/or owner is strictly prohibited. Excerpts and links may be used, provided that full and clear credit is given to Pui Hua and Fun With Little Ones with appropriate and specific direction to the original content