Since I've learnt how to operate a sewing machine recently, I just had this idea of recycling the hanky and left over fabrics for good use by turning them into soft toys. After all the texture would be just right for baby, soft and mild.
I put my plan into action last night and this was the outcome, a little owl soft toy. My little boy was so excited to participate in the making of this little owl. Now he really thought his mommy is capable of doing anything and everything. Lol.
Meet Olie, the Little Owl.
 |
| Hello World, here comes Olie the owl :) |
 |
| I love to play at night. |
What You Need
For the owl body:

For the inner stuffing:
There is no special tools required to complete this soft toy, however having a sewing machine does make it quicker.
Now that you have got all materials ready, let's get started!
Little Owl in 6 Simple Steps:
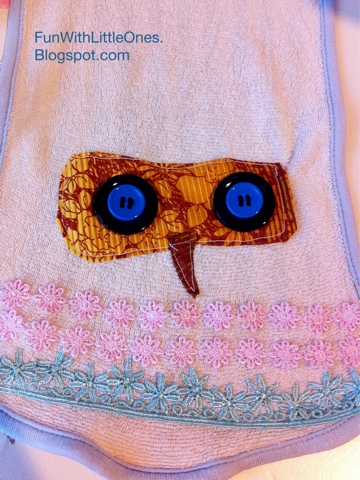
1. Decide which side is the front of the owl, start by sewing the eyes area (cut a fabric or felt like a "8" shape). Use buttons as eyes and cut a small triangle shape for the nose. Secure the fabric with pins, and sew on tight.
2. Sew few stripes of ribbons or old fabric below the eyes as the tummy.
3. On the wrong side of the hanky (the inner side), fold it on equal length, use pins to secure the positions and sew the owl's forehead like a curve shape. Continue to sew both side of the hanky to join the body. Keep the bottom opened (about 5") as you need to insert the stuffing.

4. Now, turn the hanky over, use a pen to push the pointy ears out and insert the stuffing (batting, microfiber or the Muslim cloth). I added a piece of cleaned food wrapper for that crumbled noise effect that most baby would love :). Alternatively, you can insert a small bell and this will becomes a rattling owl instead.

5. Seal the bottom of the owl's body by hand sew, cut 2 ribbons about 4" each, fold half and sew on as the legs. You can use these ribbons to hang over your fingers when playing with baby, so remember to reinforce it with extra stitches.

6. Finally, sew on a piece of fabric or some ribbons right above the legs for a neat finishing. I only sewed on for the front of the owl, you can extend to cover the back if you would like to.
That's all the steps, not that difficult after all. I had placed order for some felt and beautiful ribbons so when those arrive, do expect for more pretty owly creations.
Update...
A week later, I fine tuned my design and made 2 new owls with felt and colorful grosgrain ribbons I bought. They turned out way better than my first prototype.
Meet Ocean & Bella, the happy little owl siblings. Bella has 2 little tinkle bells, just right for my little baby and Ocean has a Mickey button, as requested by my little boy who is a fan of Mickey Mouse Club House. :)

To my delight, my little boy really liked his little owl and used it for role play, even read story book to it during bedtime. So when time allows I shall create a little owl family for him. :)
Hope this post inspires you to sew something today, thanks for stopping by!
Useful Tips!
- Make sure you choose hanky and fabric/ribbons of contrasting colors for a better visual result; strong colors are more ideal especially for kid toys.
- If you are planning to give this to a young baby, make sure you sew the buttons securely as buttons can be choking hazard. Otherwise, use a piece of felt cut in round shape instead.
Copyrights © Pui Hua and Fun With Little Ones, 2012 - present. Unauthorized use and/or duplication of any materials/photos within this website without express and written permission from this blog’s author and/or owner is strictly prohibited. Excerpts and links may be used, provided that full and clear credit is given to Pui Hua and Fun With Little Ones with appropriate and specific direction to the original content.
No comments:
Post a Comment