Showing posts with label Bags. Show all posts

Monday, March 17, 2014

{Tutorial} A Handy Tote for my Old Ma


My old ma had been unwell for a while, we had been visiting hospital frequently with her and I noticed she needs a bigger bag to carry her personal belongings. So, I spent the Sunday afternoon to make her this handy tote bag while the kids busy entertaining themselves - playing blocks, singing songs from Frozen and  had fun video-graphing themselves over and over again. I was the only fortunate audience that afternoon. 

The tote bag comes with 3 front pockets for storing her water bottle, mobile phone and umbrella. The 2 side loops are for hanging keys or just for decorative purpose. I used the same magnetic buckle which I used for the modern nappy bag I made for myself last year.


Have I mentioned that few custom nappy bags were made for some proud owners too? The happiness was when I received their thank you notes, at least my design had been pretty useful to some ladies out there. *smile*

This tote comes with a large internal compartment in matching fabric for her medicine and cardigan that she always bring along.


Complete with my label on the handle.. *always a moment of pride*


I kept to a simple design as my old ma doesn't like anything elaborate (so do I, like mother like daughter!).

Hope my old ma likes it and may God bless her abundantly and grant her speedy recovery. 


In case you would like to make one too.... 

Tutorial

I did not prepared a pictorial tutorial as I was making this in a rush, I wanted mom to be able to use it for the next appointment. However, here's a simple step-by-step sketching that explains the design. I assume you have some basic in sewing before you try to understand this drawing...:) 

You shall need:
  • 1/2 yard of thick cotton for the tote bodice
  • 1/4 yard of medium weight batting for the insert
  • 1/4 yard of matching or contrasting fabric for the front pocket and handle. 
  • 1 magnetic buckle or replaced with a loop and large button
  • Threads in matching color
  • A sewing machine
This tote bag is of the right size to fit an A4 document.

That's it, feel free to drop me a message below if you have any questions about making this tote!


Copyrights © Pui Hua and Fun With Little Ones, 2012 - present. Unauthorized use and/or duplication of any materials/photos within this website without express and written permission from this blog’s author and/or owner is strictly prohibited. Excerpts and links may be used, provided that full and clear credit is given to Pui Hua and Fun With Little Ones with appropriate and specific direction to the original content

Wednesday, December 11, 2013

Happy Birthday, to Me (New Quilted Laptop Case!)

It's my birthday, and I thought I shall reward myself for getting another year older. So, first time in my life, I made a  birthday gift for myself.

A quilted laptop case.

I selected this fabric that has simple grey and yellow semi circle in perfect harmony.

A back pocket for documents.

Simple design using just 2 straps. Can comfortably fit up to 13" laptop or smaller. 


Last but not least,a stamp of my personal brand, pea Hatch.


Happy birthday, to me. :)


Copyrights © Pui Hua and Fun With Little Ones, 2012 - present. Unauthorized use and/or duplication of any materials/photos within this website without express and written permission from this blog’s author and/or owner is strictly prohibited. Excerpts and links may be used, provided that full and clear credit is given to Pui Hua and Fun With Little Ones with appropriate and specific direction to the original content. 


Wednesday, August 7, 2013

A Bottomless Diaper Bag for A Trendy Mom! 手制摩登妈咪包包

Finally, I've completed it! A trendy looking  Diaper bag for my own used for the weekends.


We used to carry a hard shell Simple Dimple diaper bag around, it is hardy and spacious, can fit lots of stuff inside but after 4 years of continuous using (or should I say, abuse?), it has finally gave in to wear and tear. After numerous shopping trips and scouting around for a decent mommy bag, either too kiddy looking or too pricey or too large/small, I finally decided to design one for myself that is tailor-made  to fulfill my requirements.

What's my requirements? Well, the bag must be:
  • TRENDY, so it does not looks like a diaper bag
  • SPACIOUS, that I can put my duo's items in there
  • POCKETS, yes, lots of pockets for easy storage cause I hate to have things falling out.

And I gladly declare that I passed my own requirements. :)

I choose the same light grey floral fabric used for making the cushion last week. Love the elegant feel of the prints.

The front look - it has 3 spacious pockets in front, outlined with a bright yellow piping. I added a leather bucket in the middle for a neat look.


A pair of padded & re-enforced handles. I added the coffee buttons for that classic look.


Now, the interesting bit that I am really proud of - a large internal compartment with lots of side pockets for putting all the baby stuff!


I have tried to fill up the following items into the bag (and in fact there is still room for more):
Thermos, milk bottle, 2 Bros water bottles, 2 clean diapers & changing pad, some cream & med tubes, 1 kid cutlery set, 4 sets of kids changing clothes, hankie, bib.. Its unbelievable that this bag  can fit so much things in there! Now you see why I call this a bottomless bag? *wink*

Here's a picture as proof..


Test wearing time. I'm glad it did not disappoint me. *phew*


Took it out for a park visit with my duo, love the leisure look of this bag.


So, what does it took to produce this bag?
1 large table cloth...
3 late nights sewing...
and all these make 1 Happy Mom!

Oh, and how can I forgot to mention, my very own personal brand label.. Pea Hatch!  Looking good on the inner top of the bag. :)


That's all folks, thanks for stopping by, feel free to tell me what you think of this bag. 

Adios!

Sunday, May 12, 2013

Little Kid's Sling Bag (Reversible)


After making the the IKEA chair seat cover recently, I had some left over of the thick cotton fabric so I decided to make a sling bag for my little boy, who does need a bag for his piano lesson books. The current A4 pouch I bought for him is too small to hold all the books that he had accumulated over the past few months.

So I did some research and finally came across this blog by zaaberry that has just the right bag I want to make for my little musician.

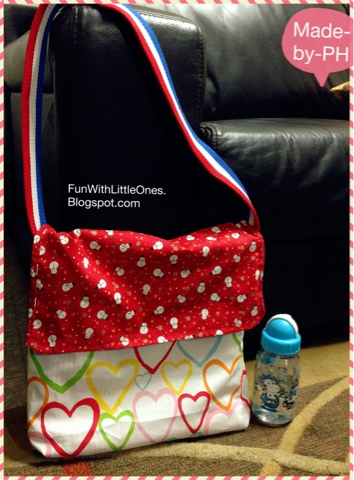
This is what I managed to make, a playful sling bag that will certainly bright up a dull day..

After ploughing through the stack of fabrics I had on my shelves, I finally settled down with the red snowman Japanese cotton for the flap, it's a Christmas gift from my sister in law. I thought its a perfect match with the red stripes fabric, no? :)

I love to have options in life, so instead of plain inner lining, I made this into reversible bag that has different prints on both sides. He can choose which sides to use for the day depending on his mood, or perhaps to match his water bottle? :)


Tuesday, April 23, 2013

Little Explorer's Backpack! 小小探险家背包


Yay... Finally, the crafting project I was working on has completed!

Here I present to you, the Little Explorer's toddler backpack for my little boy. A bag of stars and outer space. Only for the little adventurer.

Little Explorer's Backpack for my little boy


As there are more school works from his preschool nowadays, the cute little monkey backpack bought by my good friend is a bit too small to fill all his books, so I decided to put my skill to test and make a full functional backpack for him. I am just glad it turned out alright after few nights of hardwork. *relief*

Since I am using denim fabric with tiny stars print, and he had recently learnt about the Milky Way and the stars and planets from his Junior Encyclopedia book, I thought of making him some rockets and planets. Seen here are Uranus, the beautiful blue planet with a ring and our beautiful Earth, made on his request. :)

"1, 2, 3, Blast Off!!"


The deep side pockets for his water bottle and pencil case on each side, fit just nicely.


I made 2 front pockets for his snack box and stationeries, and the great Explorer's name hidden underneath the backpack cover... He really loved this.


Ample space inside, I used his favorite heart print cotton for inner lining, and attached with more pockets. Pockets for pens, pencils, rulers or any tiny little things that he often brought back from school. They always come handy. :)


I made these adjustable shoulder straps for adjustable length and a hook for hanging. These little accessories took extra hours but are certainly useful to have to ensure maximum comfort and better back support.


My little Explorer couldn't wait to try out his new bag the moment he saw it in the morning.


Curiously exploring  the hidden magnetic snap on buttons on the opening.


I hope this bag will last him for a long long time, or at least until his primary school. I used all the proper materials this time - denim fabric, bag batting, canvas straps, metal buckles etc, took me sometimes to gather all the little accessories but they certainly ensure better durability.

Well, well... I have to admit, making this backpack is NOT EASY AT ALL and I'm glad I had successful completed it. I shall compile a tutorial soon but do give me some times, there are a lot of steps involved and will not be easy to explain them clearly.. To my surprise, while there are plenty of tutorials for tote bags, sling bags, messenger bags, there aren't much tutorial available on backpack. You can check out made-by-rae where she has a toddler backpack pattern for sell. I just designed my own style without using any pattern, call me stubborn but I like to test my limit. :)

Do feel free to drop a comment or enquiry below if you would like to know more.

Until then, ciao!


Copyrights © Pui Hua and Fun With Little Ones, 2012 - present. Unauthorized use and/or duplication of any materials/photos within this website without express and written permission from this blog’s author and/or owner is strictly prohibited. Excerpts and links may be used, provided that full and clear credit is given to Pui Hua and Fun With Little Ones with appropriate and specific direction to the original content.