After making the the IKEA chair seat cover recently, I had some left over of the thick cotton fabric so I decided to make a sling bag for my little boy, who does need a bag for his piano lesson books. The current A4 pouch I bought for him is too small to hold all the books that he had accumulated over the past few months.
So I did some research and finally came across this blog by zaaberry that has just the right bag I want to make for my little musician.
This is what I managed to make, a playful sling bag that will certainly bright up a dull day..

After ploughing through the stack of fabrics I had on my shelves, I finally settled down with the red snowman Japanese cotton for the flap, it's a Christmas gift from my sister in law. I thought its a perfect match with the red stripes fabric, no? :)
I love to have options in life, so instead of plain inner lining, I made this into reversible bag that has different prints on both sides. He can choose which sides to use for the day depending on his mood, or perhaps to match his water bottle? :)
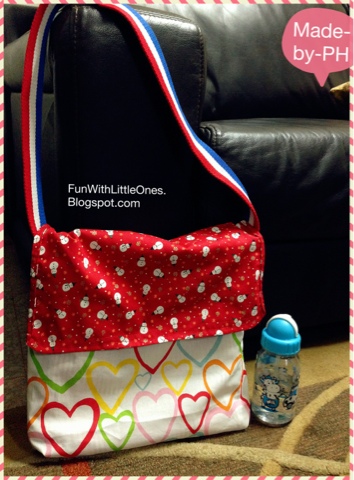
For the other side, I used the heart prints fabric that I bought from IKEA some times back. This is the same fabric that I used to make the multi purpose chair covers for my two kiddos and the exterior walls for the Convertible felt play house (which was the longest running craft project I ever had thus far!). What a versatile fabric, and it was hand picked by my little boy as he loves all the hearts :)
I included a square pocket for putting small items, like a name card, a key, a candy bar or some money perhaps? Anyway I love pockets, it's always convenient to have one.

A closed up on the boxed up side, this ensure the bag has ample room for the books and stuff.

It's so exciting to be able to create a bag, in the past I'll just go shop for one but now, I designed one instead. That's oh-so-satisfying (especially for someone who never discovered she can sew until recently..).
It's fun to flip the bag inside out then back again just to check out the look. Just couldn't decide which side that I like better..


I did not follow the tutorial fully, as I made the bag according to the size of the piano book which is slight longer, and I changed it to reversible design.
My little boy is really loving his new mommy-design bag. He was posing so excitedly when I asked to take a picture.


Just as a reference guide, these are the materials I used for this project (these measurements are only approximation, as I was in a rush to complete this bag during my baby's nap time, I did not had time to do the exact measurement):
- 2 pieces of fat quarters fabric (one for each side)
- 2 pieces of 1/4 yard fabric for the flap
- 1 yard of 3.8" canvas bag strap
I did not used interface here but I do think the flap will look nicer and firmer with interface added.
This is how I decide the size for the bag..

If you ever made a bag following the tutorial or one that is similar to mine here, feel free to add a link to your bag on the comment or send me a picture for sharing here. I know I am certainly going to make more bags later as this is just so fun!
Till later, happy crafting!
Copyrights © Pui Hua and Fun With Little Ones, 2012 - present. Unauthorized use and/or duplication of any materials/photos within this website without express and written permission from this blog’s author and/or owner is strictly prohibited. Excerpts and links may be used, provided that full and clear credit is given to Pui Hua and Fun With Little Ones with appropriate and specific direction to the original content.
Your bag turned out great! And the fact that it's reversible is really cool! Thanks for sharing.
ReplyDeleteThanks Ruby! couldn't have done this without your tutorial :)
ReplyDelete