Following the previous post on the handmade Little Explorer Backpack, as promised, here comes the tutorial on the making of this little backpack.
This tutorial is not as comprehensive as I wish it would be as I did not managed to capture all photos while I was busy cutting, measuring and sewing, however, it is none the less a lengthy one due to many steps involved. Making a backpack with sufficiently attached pockets also takes up extra time, so you may skip the pockets bit if you want a simple (but less functional) backpack.
Now let's take a look again at the little explorer backpack that I am really proud of.
 |
| Little Explorer Backpack, by PH :) |
With large storage space for all the books and stationery.

The front view...

The back view..

If you want to know more about the backpack, check the link above, otherwise, let's dive into the tutorial, shall we? :)
Here we go..
Tutorial: A Toddler's Backpack
Difficulty Level: DifficultYou would need to have basic sewing skill and relevant accessories in making this bag.
Materials Required
Sewing machine
A pair of scissors
2 dozens of fabric pins
Threads of matching colors
1 yard of outer fabric A (approximate)
1/2 yard of interface fabric B (approximate)A pair of scissors
2 dozens of fabric pins
Threads of matching colors
1 yard of outer fabric A (approximate)
1/4 yard of inner fabric C (approximate)
1/2 yard of 3.8" canvas strips in matching color
1/4 yard of matching fabric for pockets (optional)
1 pack of bias tape in contrasting color (optional)
2 plastic or metal slider buckles for shoulder straps (see below)
1 pair of magnetic button
Felt of various colors for the cover design appliques
Small strips of velcro (optional)

Felt of various colors for the cover design appliques
Small strips of velcro (optional)

I used his textbook as a guide and added extra 2" in length and width, you may vary the size according to your need. Cut all the fabrics / bias tape / canvas strap and set aside.
A) Outer Fabric (use thick cotton / home decor / denim / waterproof fabric)
You would want something durable for the exteriors, I opted for dark color so it can hide all the stains as I know my little boy will leave the backpack on the floor instead of hanging it up nicely.
2 pc 35cm x 28cm for the front and back, add extra 2cm on each side for seam
2 pc 35cm x 11cm for the both sides, add extra 2cm on each side for seam
1 pc 35cm x 11cm for the bottom, add extra 2cm on each side for seam
1 pc 23cm x 28cm for the backpack cover, add extra 2cm on each side for seam
2 pc 8cm x 12cm for the backpack cover straps, add extra 2cm on each side for seam
1 pair of 2cm x 2cm velcro for the backpack cover straps.
Extra fabrics and bias tapes for pockets in contrasting colors (optional)
B) Inner Fabric (use normal cotton / thick cotton as wished)
You may opt for normal cotton or lining material for the interior so the backpack is not too heavy.
2 pc 35cm x 28cm for the front and back, add extra 2cm on each side for seam
2 pc 35cm x 11cm for the both sides, add extra 2cm on each side for seam
2 pc 35cm x 28cm for the front and back.
2 pc 35cm x 11cm for the both sides.
2 pc 30cm long canvas strap for the side straps (you may vary the length according to your kiddo's height).
1 pc 20cm long canvas strap for the top handle.
2 plastic or metal slider buckles for shoulder strapsYou would want something durable for the exteriors, I opted for dark color so it can hide all the stains as I know my little boy will leave the backpack on the floor instead of hanging it up nicely.
2 pc 35cm x 28cm for the front and back, add extra 2cm on each side for seam
2 pc 35cm x 11cm for the both sides, add extra 2cm on each side for seam
1 pc 35cm x 11cm for the bottom, add extra 2cm on each side for seam
1 pc 23cm x 28cm for the backpack cover, add extra 2cm on each side for seam
2 pc 8cm x 12cm for the backpack cover straps, add extra 2cm on each side for seam
1 pair of 2cm x 2cm velcro for the backpack cover straps.
Extra fabrics and bias tapes for pockets in contrasting colors (optional)
B) Inner Fabric (use normal cotton / thick cotton as wished)
You may opt for normal cotton or lining material for the interior so the backpack is not too heavy.
2 pc 35cm x 28cm for the front and back, add extra 2cm on each side for seam
2 pc 35cm x 11cm for the both sides, add extra 2cm on each side for seam
1 pc 35cm x 11cm rectangular piece for the bottom, add extra 2cm for seam
Extra fabric for pockets (optional)
C) Interface Fabric (use batting, either glue on or sew on type)
2 pc 35cm x 28cm for the front and back.
2 pc 35cm x 11cm for the both sides.
1 pc 35cm x 11cm rectangular piece for the bottom.
1 pc 23cm x 28cm for the backpack cover.
D) For Shoulder Straps
2 pc 26cmx 10cm using same fabric as the outer layer as (A), add extra 2cm each side for seam.
2 pc 26cm x 10cm using same batting fabric as the outer layer as (C), no seam required.2 pc 30cm long canvas strap for the side straps (you may vary the length according to your kiddo's height).
1 pc 20cm long canvas strap for the top handle.
Part 1: Sewing the Outer Layer & Shoulder Straps
1. Assemble the outer fabric (Fabric A) like below, make sure you have all in matching length (especially the height).

2. Attach the interface batting (Fabric B) onto each piece of the outer fabric, and sew them together on 4 sides. Sew as much to the edge as possible. Adding the batting is to give firm body to the bag, sewing is not required if you use the glue-on or iron-on batting.

3. If you want to add pockets, do it now, you have to sew on the pocket pieces onto the outer fabric before assembling the rest. As seen here, I attached the side pockets and 2 front pockets using matching fabric, then sewn a contrasting yellow bias tapes for the edges. Have in mind what you want to keep in these pockets which will give you a guide on the sizes.
 |
| Side pockets |
 |
| Front Pockets |
4. Prepare the bottom of the shoulder straps as per steps shown below. It should be attached to the side fabrics, with about 2cm from the bottom of the backpack.
5. Next, sew on the top should straps. Prepare your side shoulder straps like below - I used 2 layers of internal batting to ensure extra comfort for the little shoulders. Then attach the buckles to the end and sew it on. Secure with an "X" box to strengthen the joint (see diagram below).

6. Leaving about 4cm space from the top of the fabric, pin on the shoulder straps pieces and canvas straps (refer diagram below), ensure both straps are tilted about 45 degree and not in straight line.
7. Sew along the top and bottom of the canvas straps. Sew a big "X" to secure the part where the straps joined. Your shoulder straps arenow ready. See diagram below for better illustration.
8. Now that all the pieces are ready, assemble the pieces together with the right side facing inward. Using fabric pins to hold the fabric in place, start sewing all edges together. Start from bottom then proceed to the 4 sides. A ready outer piece would look like thus.
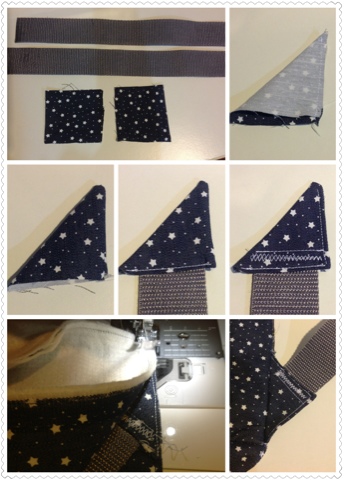 |
| Attaching shoulder straps (bottom piece) |
5. Next, sew on the top should straps. Prepare your side shoulder straps like below - I used 2 layers of internal batting to ensure extra comfort for the little shoulders. Then attach the buckles to the end and sew it on. Secure with an "X" box to strengthen the joint (see diagram below).
6. Leaving about 4cm space from the top of the fabric, pin on the shoulder straps pieces and canvas straps (refer diagram below), ensure both straps are tilted about 45 degree and not in straight line.
7. Sew along the top and bottom of the canvas straps. Sew a big "X" to secure the part where the straps joined. Your shoulder straps arenow ready. See diagram below for better illustration.
 |
| How to sew shoulder straps for backpack |
8. Now that all the pieces are ready, assemble the pieces together with the right side facing inward. Using fabric pins to hold the fabric in place, start sewing all edges together. Start from bottom then proceed to the 4 sides. A ready outer piece would look like thus.

Flip it over... As you can see the main body of the backpack is ready now.

Sewing the Inner Layer
Comparing to the external layer, inner layer is much simpler.
9. Assemble the outer fabric like below, make sure you have all matching length. Trim where necessary.

10. If you want to have pockets, sew the pocket pieces now. I added few pencil slots here.
 |
| Internal pockets for the convenient storage |
11. Join all pieces together using fabric pins, and sew them as seen below. Make sure to sew on extra lines to reinforce the bottom of the bag.

12. Next, sew the 4 sides together in a straight line, a completed inner layer should look like this.


19. Turn the external layer inside-out, place the inner layer of the backpack into the external layer, with the backpack cover in between. Like below.

20. Sew along the top edges with about 2cm seam allowance, except the back of the backpack where we'll sew on the cover later. Turn the backpack inside out, now your bag is almost ready, only missing 1 last step.

21. Ensure the bag cover is correctly aligned to the bodice (right in the center), secure it in place using fabric pins and sew a straight line across. As this line is visible from view, make sure you use matching color threads.

Now now now, the backpack is ready!
I hope you find this tutorial useful. I know it can be confusing due to the many steps and accessories involved, feel free to drop me a question and I'll try my best to reply.
That's all about it peeps, if you happen to make a backpack using this tutorial, do send me a picture or a link of it and I'll post them onto the blog for sharing with other readers.
Until then, happy crafting! :)
Some other tutorials that you may refer to:
Copyrights © Pui Hua and Fun With Little Ones, 2012 - present. Unauthorized use and/or duplication of any materials/photos within this website without express and written permission from this blog’s author and/or owner is strictly prohibited. Excerpts and links may be used, provided that full and clear credit is given to Pui Hua and Fun With Little Ones with appropriate and specific direction to the original content.
Preparing The Bag Cover
This is the most fun part of the entire process, as you get to put your creative juice to test. ;)
13. Using felt or fabric, cut out the design of your choice. I choose rockets and planets as I know these are my little boy's favorites.
14. Secure the felt cut-outs using fabric pin, sew them onto the exterior fabric Either by hand with thread and needle, or using a sewing machine. Depending on the design, this may take awhile.
15. Prepare your cover straps - attach the velcro with big "X" accross (see picture below).
16. Arrange the 3 layers of fabric and cover straps in the following sequence, secure them with fabric pins (see pictures below)


 |
| Making rocket applique for backpack cover |
14. Secure the felt cut-outs using fabric pin, sew them onto the exterior fabric Either by hand with thread and needle, or using a sewing machine. Depending on the design, this may take awhile.
15. Prepare your cover straps - attach the velcro with big "X" accross (see picture below).
16. Arrange the 3 layers of fabric and cover straps in the following sequence, secure them with fabric pins (see pictures below)
- 1st layer (top most): External fabric A with the felt design, right side face down
- 2rd layer: The 2 cover straps, velcro side face down
- 3rd layer: Inner fabric B at bottom, right side face up
- 4th layer (bottom most): Fabric C (batting)
17. Sew the fabric collage together, then turn it over to have the right side of the fabric face up. Sew a straight line along the edges again for a neater look.
Your cover is now ready. We are almost there, now just have to assemble the pieces together!.
 |
| Backpack Cover with velcro straps |
Your cover is now ready. We are almost there, now just have to assemble the pieces together!.
 |
| Applique design for the Little explorer backpack |
Joining The Backpack Together
18. If you are using a magnetic button like me, sew both sides onto the top of the backpack now. Sew it onto the wrong side of the inner layer just like the picture below.19. Turn the external layer inside-out, place the inner layer of the backpack into the external layer, with the backpack cover in between. Like below.
20. Sew along the top edges with about 2cm seam allowance, except the back of the backpack where we'll sew on the cover later. Turn the backpack inside out, now your bag is almost ready, only missing 1 last step.
21. Ensure the bag cover is correctly aligned to the bodice (right in the center), secure it in place using fabric pins and sew a straight line across. As this line is visible from view, make sure you use matching color threads.
Now now now, the backpack is ready!
I hope you find this tutorial useful. I know it can be confusing due to the many steps and accessories involved, feel free to drop me a question and I'll try my best to reply.
That's all about it peeps, if you happen to make a backpack using this tutorial, do send me a picture or a link of it and I'll post them onto the blog for sharing with other readers.
Until then, happy crafting! :)
Some other tutorials that you may refer to:
- Toddler Backpack Sewing Pattern by made-by-rae (the pattern is for sell)
- Kid's Messenger Bag by Zaaberry which I made a reversible sling bag using this tutorial.
Copyrights © Pui Hua and Fun With Little Ones, 2012 - present. Unauthorized use and/or duplication of any materials/photos within this website without express and written permission from this blog’s author and/or owner is strictly prohibited. Excerpts and links may be used, provided that full and clear credit is given to Pui Hua and Fun With Little Ones with appropriate and specific direction to the original content.
No comments:
Post a Comment