Saturday, December 20, 2014

{Repurpose} Little Dolly Dress from Daddy's Tee


Big Guy cleared up a big bag of old shirts from his closet and said its up to me what I want to do with them. I would like to "do something" indeed, but I just could not find time to work on it. There seems to be endless work and chores and things to do. If only I have 48 hours in a day, if only I can have a day all to myself, if only I am not so greedy to want to try so many things. If only.

Anyway, enough dreaming. Since the duo fell asleep early last night, I grabbed that chance to take a look into the bag, and found one of his Microsoft Tech Ed tee that he got in 2003. Haha it is old alright! But as that shirt was probably only wore once and very well kept, it looks good as new.

Inspiration strike, and I made this.

The Little Dolly dress.


My sweetie pie was extremely happy when she saw her new dress.

Would not stop dancing.

I added a pair of fluffy sleeves, these sleeves looks good on any girl's dress, like a little fairy who camouflages as little girl to bring us tons of happiness. 


I also added a butterfly appliqué in front to cover up the Tech Ed sign. It was an impromptu addition  but I thought it looks perfect, especially nowadays she is so fond of butterfly after we brought her to the Penang butterfly farm.


And this is the original shirt. Oh-so Booooring. :P

I folded it in half, traced according to her existing dress and I then bid good bye to the old Tech Ed shirt. You may noticed I traced the dress upside down as I thought It looks nicer with the leafy print at the bottom than on the chest.

Thanks Micorosoft for sponsoring this dolly dress for my sweetie pie. :)

So do you have any old T waiting to be re-discovered too? Hope this post give you some inspirations too. 

Stay calm and sew on.


Copyrights © Pui Hua and Fun With Little Ones, 2012 - present. Unauthorized use and/or duplication of any materials within this website without express and written permission from this blog’s author and/or owner is strictly prohibited. Excerpts and links may be used, provided that full and clear credit is given to Pui Hua and Fun With Little Ones with appropriate and specific direction to the original content.

Sunday, December 7, 2014

{Christmas Special} Little Pony Minky Blanket for my Little Guy, withTutorial!


I have been making Christmas presents for my little ones since I've picked up sewing as my secret hobby (although it is no longer a secret now..), I often started without an idea of what to make, until inspiration hit. Such as the  little matryoshka doll dress, the Christmas pajamas, the diy felt Christmas tree that works as sensory toy as well as decoration, or this convertible christmas felt playhouse that caused me weeks of sleepless nights.

This year, I got my inspiration when I saw the Minky fabric on sale. I have been searching for them with no luck but this time since they are within reach, I grabbed both red and blue Minky without second thought.

So for this year's Christmas, I have a new addition to the list of handmade gift for my kiddos.... Present to you, the Little Pony Minky Blanket in Blue.


I know it's meant for Christmas, but he could not resist when I showed it to my little fella. He loves hugging the ultra soft dotted blanket to bed, wraps it all around himself and rubs the dotted Minky like its his favorite soft toy. 

The little pony fabric embroidery sticker is a gift from my dear collegue Yuky, who brought it all the way home from her oversea trip. I have been keeping it in my craft treasury basket, you know, something this cute should pair with something special, and I finally found the right match.


The size is just perfect fitting for a single bed. I used 2 yards fabric each for the snowman and Minky fabrics. It costs a bit but after all this is one special handmade that money can't buy. I won't complain :)

See how perfectly it fits?

Interested to make one too? Here's the how-to!


Tutorial - Minky Blanket

1. Find 2 yards of the top and backing fabric of your choice. Believe it or not, this took me the longest compare to the rest of the steps, before I finally settled with my selection here.


2. Iron the cotton fabric to ensure its all smoothed out.

3. Cut the fabric to the desired size. Leave extra 1cm on all 4 edges of the backing fabric as it will be double folded for the sides. 

4. Using fabric pins, pin the wrong sides of the fabric together. This will helps to hold the fabric in place as you sew.

5. Now, time to start sewing. Best part of using Minky is that the dots on the fabric serve as guidelines to sew without needing to make marking. I counted 7 dots apart for each lines. 

However, Minky can be a bit hard to control as it is very smooth hence slippery, so I would suggest you to use medium speed instead of your normal sewing speed.


To make it more manageable when sewing (as you get to the last half yard you will find it is getting increasingly difficult to control due to the sheer volume...), I rolled up the completed parts inch by inch as I progressed.

6. Now that you are done with sewing all the straight lines, time to work on the edges. Double fold all 4 sides to about 1cm width and hold them in place with fabric pins, then start sewing. 


7. That's it, you are done! Now feel free to make yourself a cup of hot coffee and admire your newly made blanket, or invite your kiddo to roll out it.


If there is any part of this tutorial that is not clear to you, feel free to pop a question or two in the comment box below. I will respond soonest I can.

Next is the red minky blanket for my little girl, that shall take awhile as I am planning to make patchwork again, the last  Autumn Love Baby quilt I made for her a year ago is way too small now, she is growing like a sprouting magic bean.

So, stay tuned.. Or you may add yourself as the Facebook fan or followed by email if you do not wish to miss out the update. ;)

I am so in the mood for Christmas! ⛄️


Copyrights © Pui Hua and Fun With Little Ones, 2012 - present. Unauthorized use and/or duplication of any materials within this website without express and written permission from this blog’s author and/or owner is strictly prohibited. Excerpts and links may be used, provided that full and clear credit is given to Pui Hua and Fun With Little Ones with appropriate and specific direction to the original content.


Tuesday, December 2, 2014

{Book Review} Adventures in Cartooning by the Center for Cartoon Studies


This has got to be my captain E's favourtie book of the year. In fact, it's probably one of the best books you can get for little ones who love to draw, doodle or cartooning. 

Adventures in Cartooning: How to Turn Your Doodles into Comics!


Written and illustrated by James Strum, the founder of the Cartoon Studies center and his 2 former students, Andrew Arnold and Alexis Frederick-Frost, this paper bag book with 112 full colored pages is a real worthy buy. Dragon, knight, Princess, elf, magic.... It has all the ingredients to make it an award wining comic book. 

The story started with a princess who wanted to slay a dragon and to learn cartooning too. She met the magical drawing elf who taught her how and she ended up rescuing a bunch of Knights and defeating the dragon in the most hillarious way (or so it seemed to my E who laughed so loud when we were at page 90!)

It's one super fun book with interesting story lines and dialogs that makes you laugh-out-loud (literally LOL). It teaches you the essential techniques on comic or cartooning such as creating panels, using balloons, making story board, step-by-step guide on drawing a knight / horse / carrot etc. My little captain was so captivated by this book that he just read and re-read and re-read it every night. It seemed he will not grow bored of it for a long long time. He attempted his first comic drawing after reading it one afternoon but unfortunately I misplaced the drawing. Arrggg.. How careless. I promise I shall update this post with his drawing later.

Some sneak peak of the book..

How to make use of panels

Useful tips are everywhere..


Did I mentioned this book is too fun and cool not to own one? I did? Well, well...  check out the reviews, don't just take my words for it.


You can read the review or purchase the book online via...
MPH online (currently out of print, but you can request over the counter if you are seriously interested)


You can also find out more on James Strum's creative work by visiting his website at http://www.cartoonstudies.org/ now!


Enjoy!


Copyrights © Pui Hua and Fun With Little Ones, 2012 - present. Unauthorized use and/or duplication of any materials within this website without express and written permission from this blog’s author and/or owner is strictly prohibited. Excerpts and links may be used, provided that full and clear credit is given to Pui Hua and Fun With Little Ones with appropriate and specific direction to the original content.

Sunday, November 23, 2014

{Birthday Special} So My Little C Turned 3, Happy 3


We celebrated the 3yo birthday for my little C back in November, I finally got the time to process some of the photos for sharing.

It was supposed to be a picnic party, but due to the gloomy weather we had to switch to celebrating in our home instead. Most of the toys and games I've prepared for playing at the park gone wasted, but nonetheless we still had an enjoyable times with the little kids and friends. Thanks to all the super sporty mommies and daddies!

I am not a perfectionist mom, so I have no problem with a less-than-perfect party without matching theme decoration. We just some balloons, lots of wonderful food, a beautiful birthday cake and a bunch of happy kiddos. That is all I would ask for. :)

To begin with.. the Little Pirate birthday cake, a joint creation of mommy and her elder brother. You may read more about the cake and the making here.

I made some blue sea jellies too. There were many other great food brought by the mommies like homemade nuggets, Hokkaido milk buns etc, but I forgot to snap picture. Yicks!

As you can imagine we were busy making sure that everyone and every kids were under control, not easy to contain 8 minors in a small living hall.


Little C couldn't wait to blow the candle even before we finished singing her birthday song, and look how hard the brother had to try to save the candle... LOL. 


Btw, have you noticed the matching sibling attires? Check them out here (happy pirate top for E) and here (this one for the pirate princess).

To respect the privacy of other kids and mommies, I am not sharing the group / individual photos here. So, please pardon me.

Pressie time. She was oh-so-happy!

Thanks for the handmade felt puzzles, Shirl. And look at the special pirate ship bag, Shirl is one creative mom!

The craft set with ice cream sticks, Ashley really understands my duo and how they love crafting.. The very first ice cream sticks picture frame created by the siblings with little help from mommy (to find them the pegs)


Now, now.. Here's the dream gift for my little C -- a magical kitchen set complete with stove, oven and all the cooking utensil! The duo had been busy "cooking" for me ever since.. A big thank you to mommy Stephanie, Elizabeth and Kelly!

Folded up as a stove only. It's like a transformer.

Tired of eating pretended food several days later, we decided to start designing our own custom menu.. This was the first of our creative menu. C has the most interesting idea - what on Earth is a Potato Volcano? I have absolutely no idea, my job was just to write it down. :)

For next day celebration with her classmates at the preschool, we made these ombré Cuppies in different shade of pastel pink and purple, simple design with reduced sweetness for the little ones. The little ones had fun helping me to drop the sprinkles.

The cuppies are ready for delivery!

I reused the fondant figurine for the birthday cake to bring to school with a freshly baked cake and cuppies. Aren't they looking lovely? :)

Happy birthday my little Sunshine, Pirate Princess, Little Bunny, Sweetie Pie. Mommy will never stops loving you, and may God continue to bless you abundantly.


Copyrights © Pui Hua and Fun With Little Ones, 2012 - present. Unauthorized use and/or duplication of any materials within this website without express and written permission from this blog’s author and/or owner is strictly prohibited. Excerpts and links may be used, provided that full and clear credit is given to Pui Hua and Fun With Little Ones with appropriate and specific direction to the original content.

Saturday, November 22, 2014

Little Pirate Princess Party... Cake decorating!


My little girl turns 3 years old this week and I've organized a small picnic party with some closed friends, just few of us, our little ones and some finger foods. It's a day for the kiddos to have a fun, nothing fancy but hopefully it will be a memorable day.

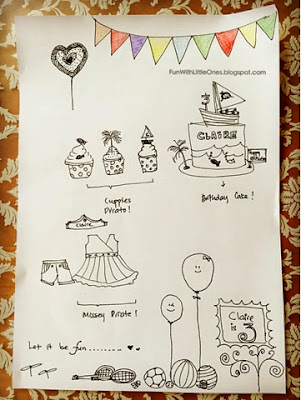
I sketched out my master plan, it pretty much sum up my plan, from cake design to pirate dress to party game. I have rediscovered my interest in drawing again since I have been drawing and painting with my kiddos often nowadays.


The birthday clothes were done some times ago. I spared few hours each Sunday in the month of November so no last minute rush this time. See, I am making it as a tradition that I will tailor make new clothes and design a cake for my duo every birthday, that translates to plenty of work for poor me. 

You can check out my little girl's pirate dress here 
Or the little brother's pirate top here 


And today, finally, I got the cake and cuppies done too.

Little Pirate Princess Cake & Cuppies


Fully designed and hand crafted. Combined both fondant and buttercream techniques this time, feeling rather happy with my little improvement. Hmm, just realized this is my 5th attempt at cake decorating in 3 years. No wonder I am progressing so slowly.


Hello, princess.

My little C really loved her cake & cuppies. Kept asking me, "you made this for me, mommy? You made this for me?". 

Yes baby, I made this for you. Mommy will continue to make your birthday cake every year till it comes the time I have to stop. 

The making of the figurine, I used a spaghetti to hold the body in place, so the whole figurine is actually edible. 

Noticed the change in the eyes? I found I have made them a bit too big and looking kind of creepy, so had them replaced with smaller pair of eyes. Good thing of decorating with fondant is that it's rather forgiving.

The naked cake, and the simple decorated cake before all the toppings. These are actually simple piping using star tips, after last round of practice I'm pretty confident with piping now. 


As you can see, there are quite a lot of tools and preparation involved (the pictures below only showing a quarter of them), so do be generous with your cake decorator.. It's really quite some hard work there. *wiping my sweat*

Cuppies decoration in progress.

I know the cake and cuppies are simple in compare to what you can get from the professionals, but these are guaranteed fresh, healthier (reduced sugar, quality ingredient) and most importantly, full of mommy's love. In fact my little ones get to participate in the making and they were playing with the left over fondant as if those were playdoh.

By the way, did you noticed the little boat behind the figurine? It's a tiny boat full of roses and lilies for the pretty princess. :)


So, what's next? Games for the park are packed, picnic gears ready, party bags for the little friends ready, all that is left is some jelly and oh, pray for a great sunny day tomorrow! ❤️


Copyrights © Pui Hua and Fun With Little Ones, 2012 - present. Unauthorized use and/or duplication of any materials/photos within this website without express and written permission from this blog’s author and/or owner is strictly prohibited. Excerpts and links may be used, provided that full and clear credit is given to Pui Hua and Fun With Little Ones with appropriate and specific direction to the original content.


Saturday, November 8, 2014

Painting Fun.... Of Colors & Brushes


Little ones and I have been painting again lately. I have stopped it for the past few months as my little girl can be quite a messy queen and leave behind a huge scene for me. Not that she is any less messier now but at least she will take instructions better and know how to clean up after herself and tidy up the 'crime scene', so I decided to start the weekend painting / crafting routine.

I shopped for some new paint brush to teach my little handsome the different brushing techniques which I could still vaguely recall. I attended drawing classes ages ago, when I was still a primary schooler myself. 

We setup the table and tools, and they could not wait to get started. To avoid fighting, each have their own set of water colors and palette. I used the disposable kitchen tower we bough from the RM5 shop to dap the brush, very absorbent and no washing required afterward! 

For little C, I let her paint on pre-printed A4 papers while for E who's already 5.5 years old, I let him draw on the drawing paper and choose his own colors. I then guided him how to make use of the different brushes like how my art teacher used to guide me..

• Round point - used for strokes, lines and coloring large objects
• Liner brush - for fine lines,detailing and outlining
• Flat - for creating texture effect like wood, water, grass, clouds.

Unfortunately my little boy had much shorter patience than me, after spending a min listening he showed me that bored face and couldn't wait to start painting right away. LOL, I love to annoy him sometimes, privilege of a mom. *evil laugh*


The result? To my surprise they are bad at all. I love their use of colors, bold and eye catchy.


Painting by my little E. I love those multi-colored trees and the multi-level super market (it's not a tower as he claimed its too small to be one). I helped him on some of the objects in order to explain the different brushing technique, but the choice of colors was solely his. Can you tell which cloud was mine or his creation? 

Painting by little C. This is the 3rd of her painting and she has finally learnt to control the paint brush better without smudging too hard till the paper is torn. That is one big improvement if you ask me.I don't care so much if she colors within the line, or use the "logical" color of the object. Just want to let her express her creativeness and enjoy the fun of painting. After all this is her artwork, not mine. I think she deserves a star for this piece. :)


It's a fruitful 60 minutes spent and I honestly look forward for the next weekend..

Happy Sunday!


Copyrights © Pui Hua and Fun With Little Ones, 2012 - present. Unauthorized use and/or duplication of any materials/photos within this website without express and written permission from this blog’s author and/or owner is strictly prohibited. Excerpts and links may be used, provided that full and clear credit is given to Pui Hua and Fun With Little Ones with appropriate and specific direction to the original content.