Wednesday, July 31, 2013

A Handmade Pressie for The Newborn 手制小宝宝礼物

Opps... I did it again. Sewing on a weekday night! I just couldn't resist it, too many ideas but too little time to execute them all. Finally I waited till my duo asleep, and I managed to sneak outthe room   to make these pressie for a friend's newborn baby girl. Well, not so newborn anymore, she is 1 month old by now.

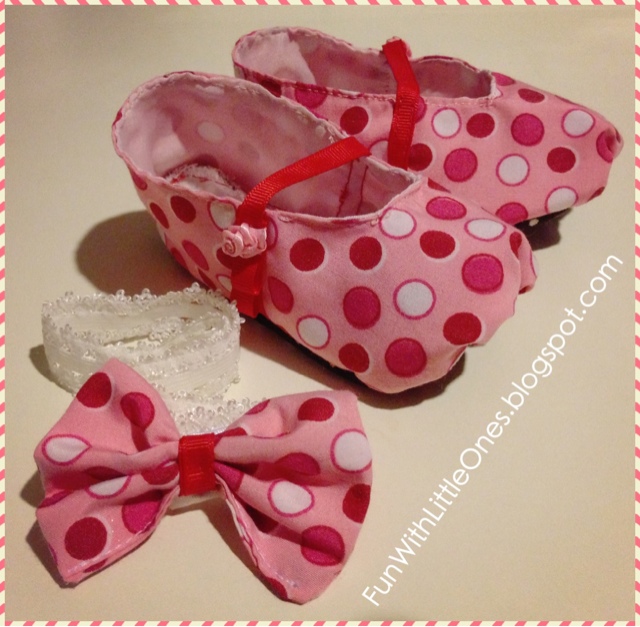
A pair of groovy looking booties with a matching hair band made of soft lace elastic.


It's good that I have all the accessories ready - lace elastic, embellishment, ribbons. I used soft cotton lining with the fun polka-dot print cotton fabric. No padding added for the booties to ensure its airy for the little feet that have yet to learn to walk nor stand.

My friend has yet to see this handmade gifts I made for her baby, I certainly hope she likes them, despite there's is a little flaw where the ribbons are misaligned for both booties. Only noticeable when you arrange the booties side by side.

I sew on my personal brand this time, Pea Hatch. Finally the first handmade booties by the famous kids apparel designer (LOL, I'm certainly in a dreaming mood).


Anyway, I would be glad to know what you think of these little pressie and please please, do feel free to give any suggestions for improvement!

That's all & good night. I'm going off to bed now for its another long day at work tomorrow. Zzzzzzzzz


Copyrights © Pui Hua and Fun With Little Ones, 2012 - present. Unauthorized use and/or duplication of any materials/photos within this website without express and written permission from this blog’s author and/or owner is strictly prohibited. Excerpts and links may be used, provided that full and clear credit is given to Pui Hua and Fun With Little Ones with appropriate and specific direction to the original content.


Saturday, July 27, 2013

10 minutes Envelope Cushion Cover (from table cloth)

I walked passed a kitchenette store warehouse sale and was attracted to the range of table clothes and tea towel mat on sale. I have no need for neither of them but with the beautiful prints and super attractive price (which is impossible to find in any fabric store I frequently patronage!),I bought a dozen of them for home improvement project instead. I didn't had anything specific in mind but I knew I could figure it out later... (Sound like an impressive purchase I know, but the prints are lovely and I'll show you that! :)

So this is the first of the home improvement series... New cushion cover for our living hall. Pinkish chrysanthemums over the grey background.
 
I made 2 of these from the large piece of table cloth, still have enough left over for 2 more covers. 

Our existing cushion cover still in good shape, but now we have the choice of a bold wine red or a chic floral grey. Good to have choices in life. :)

I choose middle-opening envelope design so there is no need for buttons nor zip, more comfortable for my little ones who nap on the cushion sometimes. The making is so easy that i have no excuse to give my living hall a new look! :)

Here's the simple steps. 


1. Using the existing cushion cover as my pattern, laid it over the new fabric (wrong side facing up).
2. Then i gave about extra 3" on the side for the envelope design (original cover is with zip) and cut 2 straight lines.
3. Place pattern in middle of my fabric (right side facing up now), fold both side inward to form an envelope; adjust so I have the opening in the middle (take note- not on the side).
5. Pin the fabric in place and start sewing - just 2 straight lines, then hem, and It's done!
6. Test it onto my cushion right away :)

Simple, low cost yet elegant looking home improvement project that feels good. 


Copyrights © Pui Hua and Fun With Little Ones, 2012 - present. Unauthorized use and/or duplication of any materials/photos within this website without express and written permission from this blog’s author and/or owner is strictly prohibited. Excerpts and links may be used, provided that full and clear credit is given to Pui Hua and Fun With Little Ones with appropriate and specific direction to the original content. 


Homemade Puppet Theater! 小小木偶剧场

Like most little boys his age, my little captain talks well, sings well, dances well and even can cracks some jokes with us, but only when he's with the familiar faces. Once surrounded by stranger or he became the centre of attention, he will be extra quiet and refuse to speak up. I suppose stage fright is common among young kids his age (he's 4 years old) but I would really like to see him perform well in the coming school annual performance, hence I made a plan to help him build up his courage.

Instead of sending him to drama class, or anymore extra curricular activities apart from his preschool, I made this - a homemade puppet theater for him to put up a show. 


I picked a dark polka-dot wrapper, looking like a screen but infused with some fun feeling. 

Right after Big Guy and I setup the "home puppet theater" in our backyard, the duo were so excited and helped to get some stools to be the audience seats. See how they grabbed a preferred seat each and starred at the empty frame, how amusing :)


And we have to pay for the entrance tickets! Thanks to Big Guy who helped to design and print the cute looking tickets right before show began. :)

My little captain picked his Christmas music box to be his entrance fee collection box, pretty good choice I would say, as he used the music box for background music when he performed.


Big Guy and I had fun watching our little handsome performed, he came up with some funny story about the platypus and penguins knocking down a tree, well, I have no idea why they wanted to knock down the tree, but it was certainly fun to watch him trying hard and his confident growing stronger from his first virgin performance to the next ones which went a lot smoother. He was excited after the first round and offered to put on 2 more shows for us FOC. It is wonderful as parent to see our little one's confident smile.

Puppet show shall be one of our weekend activities from now onwards. Perhaps we shall host a gathering for him to perform his show to the friends and family, it would be interesting to see how he will handle the pressure. *evil laugh*


The making is easy, the materials you will need: 
• an TV/LCD size cardboard or styrofoam.
 1-2 piece of wrapping paper with nice prints
• masking tapes
• some felt for the curtain (optional)

1. First, find the right size cardboard or styrofoam. I found this at my sister's house right before they discard it!


2. Using a knife or cutter, cut the frame for your home theater. Keep little one away while you are doing this in case they play with the knife while you're not watching.


3. Wrap it around with the wrapper of your choice, then tape them on tight.

4. Cut 2 small triangle pieces to hold the frame in place. Glue on tight. (That was my original plan, but big guy offered to make a special wooden stand instead. Well, his carpentry skill certainly came handy.


5. For the curtain, just cut 2 pieces of red felt and glue on to the top of the frame, tie them up using little ribbons. I skipped this step as my duo couldn't wait to begin the show, kept asking what time the show will start, LOL.

6. If you have some extra time, design a ticket with a value, great avenue to teach the little ones the concept of money.


That's all. It's a cheap and simple craft but do require a bit of work, this one took me approximate 45 minutes including the time i took to ponder on the design but extra 40 minutes for my big guy to make the wooden stand.


If you happen to make a puppet theater  too, feel free to post onto our Facebook page for sharing!

XOXOXO
PH


Copyrights © Pui Hua and Fun With Little Ones, 2012 - present. Unauthorized use and/or duplication of any materials/photos within this website without express and written permission from this blog’s author and/or owner is strictly prohibited. Excerpts and links may be used, provided that full and clear credit is given to Pui Hua and Fun With Little Ones with appropriate and specific direction to the original content.
Thursday, July 25, 2013

It's Tinkerbell! A DIY Reversible Costume. 自制小叮铃裙子

It's done! The little DIY Tinkerbell dress for my sweetie pie, with a pair of long shoulder straps that I can tie to the back of her neck like a big bow knot.

Isn't it looking pretty? I especially like the leafy skirt effect.

Just like the real Tinkerbell costume (or I choose to think so :)


The back design, I use large floral button for extendable wearing, this dress can easily grow with my baby girl as I have extra of 6-8cm at the back :)


A special dress calls for a unique button, I'm using one of my favorite wooden button collections. 

And did I mentioned its reversible? Yup, I can choose whichever shade of green I like, just perfect for my 19mo who's self feeding now, always stain her dress.. So having it wearable on both sides is certainly convenient when we are out and about. :)


Happy happy happy, is the only word to describe my feeling now. And next is, Peter Pan costume for my little Captain!


Psssss... Interested to make one too? Check out the great tutorial from Prudent Baby


Copyrights © Pui Hua and Fun With Little Ones, 2012 - present. Unauthorized use and/or duplication of any materials/photos within this website without express and written permission from this blog’s author and/or owner is strictly prohibited. Excerpts and links may be used, provided that full and clear credit is given to Pui Hua and Fun With Little Ones with appropriate and specific direction to the original content.


Wednesday, July 24, 2013

Fun Toy - Stack Count Push with Musical Snail Pal! 多功能小孩玩意儿介绍

If you have only RM100 budget to buy a toy for an infant under 1 year old, what will be your choice?

My personal favorite will be this - Fisher Price's Musical Snail Pail Shape Sorter.


Why, you ask? The reasons are aplenty, let me share with you...
  • It encourages shape recognition and sorting skill. Which the name itself suggested what it's designed for :) the snail comes with music to attract the young toddler, we never replaced the battery after it wore off but that didn't hinder the kids' liking on this toy.
  • The big, vivid color blocks makes it ideal for learning color. I guided baby C to stack the same colors or same shapes together. Took her quite a while to understand the rules but a little patient certainly pays off.
  • It allows training the little ones on eye-hand coordination. Stacking up those blocks together can be quite a challenge task for the little ones and don't forget to praise when they manage to do it sng gives encouragemeny to try. My baby C was so excited when she  managed to stack all the 10 blocks up and she happily pushed the block tower down with a big "YAY".Moment right before the tower was smashed down..
  • One last thing that I am pretty certain this toy was not built for - it is great for spinning around like a top, this will be fun for older toddler who has better motion control. We used these blocks as tops and spinned them around to see whose can spin the longest. Spinning, spinning, spinning...
  • Not to forget, these little blocks are ideal for teaching counting from 1-10, I count along each time Baby C does the stacking, eventually she learnt to count by herself.
  • Personally I like the excellent quality of this toy: the colors are lasting, it can withstand the baby's ruthless usage hence can pass down from one kid to another. This little snail pal belongs to Captain E when he was 8 months old, he had plenty of fun with it and it survived till today, still in good shape and functioning well. I am sure it can still be passed on to the next baby once Baby C grows out of it, although we have no plan for a 3rd baby at this moment. ;)

In short, this is a really all-in-one toy that allow various ways to have fun and keep the little ones occupied. It can be a little pricey but a worthy one I would say. :)


Just A Suggestion..
For hygiene reason, I gave these blocks a soap bath once every 2 weeks and sun them for about 20 minutes. Although the color may fade a little, they are definitely cleaner and safer.


That's all folks, if you are interested to get one, head on to any major baby stores or you are sure to find it in Toy 'R Us too.


Copyrights © Pui Hua and Fun With Little Ones, 2012 - present. Unauthorized use and/or duplication of any materials/photos within this website without express and written permission from this blog’s author and/or owner is strictly prohibited. Excerpts and links may be used, provided that full and clear credit is given to Pui Hua and Fun With Little Ones with appropriate and specific direction to the original content.

Monday, July 15, 2013

DIY Pouch for Little Girls 小女孩包包

Despite we got home late last night, I just needed to sew something. The personal time between me and my sewing machine is such a therapeutic enjoyment nowadays. The ability to create something pretty and useful makes me feel good; just like the crazy old days when I wrote a piece of solid programming code.

Anyway, this is what I have designed and created. A handy pouch to store my little girl's tiny toys and flash cards.


It's really just a wristlet that can be used for kid or adult. It has a handy strap that I removed from an unwanted wristlet sometime ago, recycled for good use now. Somehow I'm into recycling and re-purposing nowadays, only challenge is keeping my storage space organized (its a big challenge, no joke on that!)

I really like the little bunny applique on the front. Reminding me of my cutie bunny girl..


A personalised label on the back.

It comes with small compartments for easy storing of flashcards, personal cards, notes or other tiny toys. I used invisible zip here as I thought it gives a neat finishing.


What do you think about this pouch? I'm toying the idea of making one for myself too, without the little bunny appliqué of course. Should I? Hmmm...


Easy. Simple. Craft. 
Totally Satisfied. 


Copyrights © Pui Hua and Fun With Little Ones, 2012 - present. Unauthorized use and/or duplication of any materials/photos within this website without express and written permission from this blog’s author and/or owner is strictly prohibited. Excerpts and links may be used, provided that full and clear credit is given to Pui Hua and Fun With Little Ones with appropriate and specific direction to the original content.


Friday, July 12, 2013

It's a Small Small World... With Globe 小小世界...地球仪

My little captain is getting curious about everything, on and off he pops questions that show he is analyzing and tries to make sense out of the things that are happening around him.

Since I told him we have made plan for a trip to the land of Maori, he has been having so much questions..

"How far is it?"
"How are we going there?"
"Does it snows there?"
"What is Maori? How do they look like?"
"What are we going to do there?"

To help him understand better, I decided to introduce some visualization aid. Hence, we thought its time to get him a globe.


It's a miniature globe that is built to actual scale, we got it from Times book store for RM89.90, pricier compare to others we saw but the quality is good, and it shows all the continent and country's names.

I started by teaching him what each of the colors represent..

blue for water & ocean..
brown for the land... 
white for the cold cold snow... 

Simple basic that is easy to understand for the little mind.

Then we tried to locate Malaysia on the globe, since he had learnt about where we stay earlier when I introduced him to the map. You may read up on the earlier post here where I first introduced him to map reading.

He found it difficult to identify Malaysia on the globe at first, so I told him..

"Look at Malaysia, doesn't it looks like a sweet potato?"


Thursday, July 11, 2013

Home Improvement: Floral Chair Seat Covers (自制座套)


Another task completed from my Chinese New Year to-do list -- the floral print dining chair covers. Yes, all 6 of them done and ready to welcome the guests this CNY! *yay*

What's missing is only a matching place mat for the centerpiece on the dining table.

Looking lovely when placed on the chair.


Each chair cover has its unique print.


I sewn 8mm white ribbons at both corners to allow easy tie on onto the chair.


Tutorial: Little Explorer Backpack 小小探险家背包(附图片教程)


Following the previous post on the handmade Little Explorer Backpack, as promised, here comes the tutorial on the making of this little backpack.

This tutorial is not as comprehensive as I wish it would be as I did not managed to capture all photos while I was busy cutting, measuring and sewing, however, it is none the less a lengthy one due to many steps involved. Making a backpack with sufficiently attached pockets also takes up extra time, so you may skip the pockets bit if you want a simple (but less functional) backpack.

Now let's take a look again at the little explorer backpack that I am really proud of.

Little Explorer Backpack, by  PH :)

With large storage space for all the books and stationery.


The front view...


The back view..


If you want to know more about the backpack, check the link above, otherwise, let's dive into the tutorial, shall we? :)

Here we go..

Tuesday, July 9, 2013

Let's Do Playdoh!

My little Captain was so excited when I told him about the mommy-made Playdoh, after I came home from work and while having my dinner, he kept bagging me to play the playdoh with him.

So we started right after I finished my dinner, and look what have we created? Pretty happy with our team work :)


Steamed Pao, peanuts, peas and red apples! 


Spaghetti with drumsticks and salad.


Burger with fries and baked beans & peas


A little octopus with a hat, tentacles by my little boy, face by mommy :)


A jade dumpling by my nephew!


Pizza and Taco by the cousins..


It started with only 2 of us, then one by one my baby girl, the cousins and even my old Ma came to join the fun. :)

Interested to make some homemade playdoh too?  Check out the method here.


Copyrights © Pui Hua and Fun With Little Ones, 2012 - present. Unauthorized use and/or duplication of any materials/photos within this website without express and written permission from this blog’s author and/or owner is strictly prohibited. Excerpts and links may be used, provided that full and clear credit is given to Pui Hua and Fun With Little Ones with appropriate and specific direction to the original content.

Monday, July 8, 2013

Homemade Play-Doh, Cheap & Fun!

Look at these lovely little doh balls, don't you just love the vibrant colors? 


These homemade play doh are stretchable but not sticky to the hands, feels just like the real thing, only better. There is no preservative, no harmful chemicals as only edible ingredients are used. Hence, absolutely toddler friendly! *see footnote


Making it only involves 4 simple steps..

Friday, July 5, 2013

Re-Purpose Singlet to Little Girl's Dress! 小背心大变装!

Yay, another re-purpose project completed! It was a spontaneous act of craftiness and I managed to turn this stretchable singlet that was a bit too right into a ruffled little girl's dress. Not sure what you think of it, but I am feeling quite pleased about it. :)


The before and after...


I added a bow and a created a ruffled edges on the bottom of the dress, to create a designer like feel (or so I choose to think so ;)

Tuesday, July 2, 2013

Special Craft for the Little Artist... Art-Pad! 小小艺术家美工袋

Mommy has an iPad;
Daddy has an iPad;
Grandpa has an iPad;
Grandma has an iPad...
And my little Captain? He has an Art-Pad.
No joke, it's the exact size of an iPad! :)


It comes with 11 slots for the coloring pencils or crayons, and a large compartment for the notepad and papers up to B5 size. In fact, can fit his favorite toy cars too. I added a matching fabric handle on the side so he can carries it like a little pouch when going out, designed for mobility and comfort for the little hands. :)


I could have make this Art-Pad bigger in size but I thought this can nicely fit into his Reversible Sling Bag or Explorer backpack I made for him. Any bigger, it may be too bulky.

OK, a little confession. I have been wanting to make him and the baby sister a carrier bag since sometimes back, some how it didn't happened and remain a thought at the back of my mind, until yesterday. After I bought a box of 24 washable Crayola crayons for my girl, who had shown keen interest on drawing or should I say, scribbling, I decided to divide the box into half so she can have a set in the nanny's house and another set at home. After all, out of the 24 crayons there are several duplicate colors in similar shade. For her current stage, I only need basic color set for me to teach her the color naming.

I used thick cotton for the exterior cover for durability reason and felt for the interior for easy crafting. I spent a fair bit of time choosing fabrics and felt of different color for that contrasting effect. I am quite happy with the outcome of my color choice. *wink*

The front exterior.. a naughty bear with the giggling eyes :)


The rear... with his name and a little star for the captain.


The pencil holder slot.. enough to hold up to 11 pencils!

A tiny "Hand Made" charm. To prove that this is mommy's TLC creation. :)


So, are you interested to make one too? Read on then.. But if you are not into sewing yet would like to own a piece of this, do place an order with my online store, http://PeaHatch.blogspot.com, I shall be happy to custom made a unit for your litter one if my time permit.

Materials You'll Need:

  • A sewing machine
  • A pair of scissors
  • A fabric pencil
  • Thick cotton / normal cotton, B5 size (varied depending on your preference)
  • Thick felt, B5 size (varied depending on your preference)
  • Thick felt for crayon holder, approximate 22cm x 10cm (choose contrasting color)
  • Thick felt for notepad holder, approximate 22cm x 16cm
  • Extra fabric for handle - a pair of 14cm x 4cm
  • Threads of matching color
  • A pair of Velcro, 10cm in lenght
  • Extra felt or ribbons for decoration

The Making:

1. Cut all the fabric pieces into desired sizes. Sew on the crayon holder and notepad holder first, decide where you want to place the velcro. Leave about 2cm apart for each crayon compartment.


You may want to test with an actual pencil / crayon before you proceed to sew all the slots. 


2. Start decorating the exterior fabric. As you can see here, I personalized the cover with a little yellow bear applique and my little Captain's name. 


Attaching the Velcro tape, make sure you sew an "X" across.


3. Place the fabric wrong side facing each other, if you are adding a handle too, slot the handle into the desired side and pin both sides onto the edge. 

4. Sew along the 3 sides, leaving the top part open (where the Velcro tape is). Clip the 2 corners as shown in the picture below.


5. Turn the fabric over, we are almost there. Take sometime to check for any misalignments that need to be corrected. It is better to detect now before you seal off the top. I never like removing stitches, I am rather clumsy with that. *arrggghh*


6. Seal the top by stitching both ends together. I attached a bias tape to create a neat finishing but it is really optional. It is just me who likes everything trim and proper, you may call it an OCD syndrome... :S


That's all the steps, not too difficult right? Actually it can be completed in about 45 minutes if you forgo all the decoration. It is always the tiny details that is time consuming (but then again it's the tiny details that makes the different), otherwise it is as easy as combining 2 rectangular shape and flip them over. :)


My little Captain really likes this Art-Pad, couldn't wait to start drawing right away when I showed it to him after I got back from work. Would love to see how my sweetie pie react to this thou, althought I am pretty sure she will love this, especially the little bear with the rolling eyes.. :)


Not To Forget...

If you do make an Art-Pad following this tutorial, do share with me and the readers here by emailing it to me posting it onto the Facebook page, will you? You can become a Facebook fan by clicking on the "Become a Fan" button at the bottom of this post. *wink wink*

Just one tip: If you do not have Velcro tape at home, you may replace it with buttons and an elastic band. Just like what I did with my baby girl's Spring Blossom blouse.


Till later, Happy crafting peeps!


Copyrights © Pui Hua and Fun With Little Ones, 2012 - present. Unauthorized use and/or duplication of any materials/photos within this website without express and written permission from this blog’s author and/or owner is strictly prohibited. Excerpts and links may be used, provided that full and clear credit is given to Pui Hua and Fun With Little Ones with appropriate and specific direction to the original content.